
Page 46 - The Decorative Painter Spring 2017
P. 46
INKING
There are three steps to the inking process, and it will take about 75 percent of the overall time involved in this project. It is important that you relax, take your time and
STEP 2 5 34 34
66
22
78 78
11
99
STEP 1 5
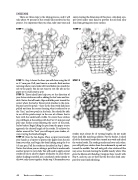
STEP 1: Step 1 shows the lines you will draw using the M or 0.7 mm pen. Pull your lines in a smooth, fluid motion noticing where your stroke will travel before you touch the nib to the paper. You do not want to rest the nib on the paper or it could create a spot.
STEP 2: These inked lines help you set the direction of your future strokes as well as adding the leaf veins and ten- drils. Notice that all bends, flips and folds point toward the center where the leaf or flower petal attaches to the stem. Pansies have five petals – three in the front with dark lines pulled out from the center forming what is referred to as the “face,” and two petals in the back. You should be able to see all five petals except in the case of a flower that is bent with the underneath visible. To create these strokes you will begin at the outline with the F or 0.5 mm pen and pull your strokes away following the curve of the petal, leaf or basket. Begin lifting the pen from the paper as you approach the desired length of the stroke. To achieve the darker areas of the “face” you will repeat your strokes, al- ways varying the finished length.
STEP 3: Now the fun begins. Place a paper towel under your hands as a barrier to protect the paper from the oils from your skin, and begin the detail inking using the S or 0.3 mm pen. Pull the strokes as described in Step 2 above. Notice that when you are inking a petal that is underneath another petal, it is very dark. You will need to apply several strokes of ink to achieve degree of shadow. In areas where darker shading is needed, use a crosshatch stroke similar to this ###, only closer together. Study step 3. Remember your
STEP 3
enjoy creating the dimension of this piece. Also keep a pa- per towel under your hand to prevent the oil from your skin from getting onto your surface.
44 The Decorative Painter • SPRING 2017
DECORATIVEPAINTERS.ORG
strokes must always be of varying lengths; do not make them look like marching soldiers. For the basket, I inked all of the horizontal reeds then turned my work and inked the vertical reeds. The reeds go under and over each other; you will pull your strokes from the underneath, up and out toward the middle. You will only pull a few strokes all the way across the reed, leaving the middle mostly white. This gives the illusion of it bending. Compare Steps 1 and 2 with Step 3, and you can see how flat the first ones look com- pared to your finished inking.
