
Page 2 - How do I Add a Manual Position for Cash Positioning Worksheet
P. 2
Add Manual Position – Cash Positioning
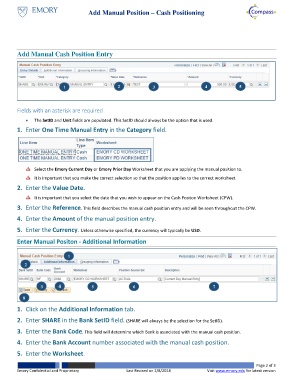
Add Manual Cash Position Entry
1 3 4 5 6 7
1 2 3 4 5
Fields with an asterisk are required
The SetID and Unit fields are populated. This SetID should always be the option that is used.
1. Enter One Time Manual Entry in the Category field.
Select the Emory Current Day or Emory Prior Day Worksheet that you are applying the manual position to.
It is important that you make the correct selection so that the position applies to the correct worksheet.
2. Enter the Value Date.
It is important that you select the date that you wish to appear on the Cash Positon Worksheet (CPW).
3. Enter the Reference. This field describes the manual cash position entry and will be seen throughout the CPW.
4. Enter the Amount of the manual position entry.
5. Enter the Currency. Unless otherwise specified, the currency will typically be USD.
Enter Manual Positon - Additional Information
1
2
3 4 5 6 7
8
1. Click on the Additional Information tab.
2. Enter SHARE in the Bank SetID field. (SHARE will always be the selection for the SetID).
3. Enter the Bank Code. This field will determine which Bank is associated with the manual cash position.
4. Enter the Bank Account number associated with the manual cash position.
5. Enter the Worksheet.
Page 2 of 3
Emory Confidential and Proprietary Last Revised on 2/8/2018 Visit www.emory.edu for latest version