
Page 32 - the art of mushrooms
P. 32
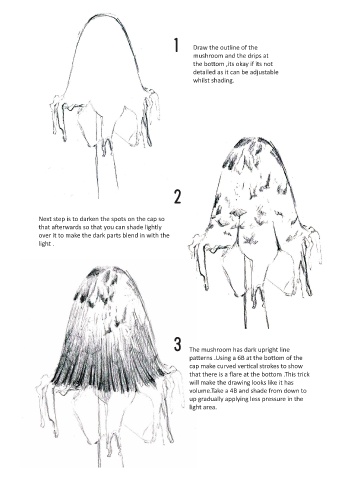
1      Draw the outline of the


                                                                     mushroom and the drips at                                                                                       4      The next step is to darken the drip
                                                                     the bottom ,its okay if its not                                                                                        at the bottom , using 8B or 9B apply
                                                                     detailed as it can be adjustable                                                                                       strong pressure to get an intense black
                                                                     whilst shading.                                                                                                        colour ,bear in mind that the drip has a

                                                                                                                                                                                            glossy shine to it so avoid shading in
                                                                                                                                                                                            the reflection of the light and work
                                                                                                                                                                                            around it .


                                                              2


               Next step is to darken the spots on the cap so
               that afterwards so that you can shade lightly
               over it to make the dark parts blend in with the
               light .


                                                                                                                                                                                  5
                                                                                                                                    The last step is to soften the shading by a
                                                                                                                                    making a seamless gradient .when
                                                                                                                                    shading keep short or circular strokes
                                                                                                                                    ,bigger strokes will make the pencil stroke
                                                                                                                                    more prominent . Take a kneaded eraser
                                                                                                                                    and erase higlighted areas like the top
                                                                                                                                    right area where the line does not meet
                                                              3     The mushroom has dark upright line                              because the light is intense .and on top
                                                                                                                                    of the drip to give a glossy finish look .

                                                                    patterns .Using a 6B at the bottom of the                       Shading the stalk by darkening each
                                                                                                                                    end of the stalk leaving the middle white.
                                                                    cap make curved vertical strokes to show
                                                                    that there is a flare at the bottom .This trick
                                                                    will make the drawing looks like it has
                                                                    volume.Take a 4B and shade from down to
                                                                    up gradually applying less pressure in the
                                                                    light area.


        32                                                                                                                                                                                                                            33