
Page 11 - Final GA Parent Teen Driving Guide Updated August 2021
P. 11
&
SESSIONS 1 2
Getting Ready, Starting,
Placing the Vehicle in
Motion, and Stopping
Sessions 1 and 2 should be divided into four
30-minute periods. These sessions introduce
your teen to the instrument panel, vehicle con-
trols, and mirror blind spots. Please review the
vehicle owner’s manual before and during these
sessions. You will need a measuring tape, cones,
or plastic cups to use in these and future lessons.
Begin in a large, level parking lot free of ob-
stacles. Use the checklist on the next page to
help organize your lessons and assess learning
during the second half of session 2.
• Prior to entering the vehicle, the teen should
check for fluid leaks, broken glass, objects
behind the vehicle, etc.
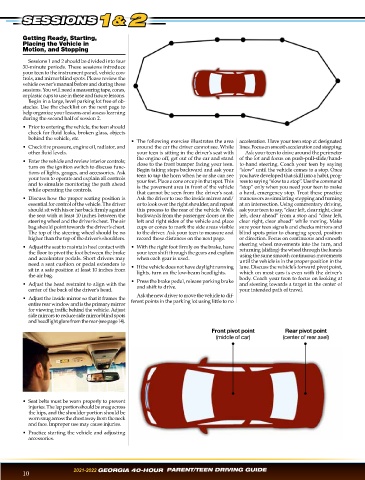
• The following exercise illustrates the area acceleration. Have your teen stop at designated
• Check tire pressure, engine oil, radiator, and around the car the driver cannot see. While lines. Focus on smooth acceleration and stopping.
other fluid levels. your teen is sitting in the driver’s seat with Ask your teen to drive around the perimeter
the engine off, get out of the car and stand of the lot and focus on push-pull-slide/hand-
• Enter the vehicle and review interior controls;
turn on the ignition switch to discuss func- close to the front bumper facing your teen. to-hand steering. Coach your teen by saying
tions of lights, gauges, and accessories. Ask Begin taking steps backward and ask your “slow” until the vehicle comes to a stop. Once
your teen to operate and explain all controls teen to tap the horn when he or she can see you have developed that skill into a habit, prog-
and to simulate monitoring the path ahead your feet. Place a cone or cup in that spot. This ress to saying “slow to a stop”. Use the command
while operating the controls. is the pavement area in front of the vehicle “stop” only when you need your teen to make
that cannot be seen from the driver’s seat. a hard, emergency stop. Treat these practice
• Discuss how the proper seating position is Ask the driver to use the inside mirror and/ maneuvers as simulating stopping and turning
essential for control of the vehicle. The driver or to look over the right shoulder, and repeat at an intersection. Using commentary driving,
should sit with his or her back firmly against this process to the rear of the vehicle. Walk ask your teen to say, “clear left, clear right, clear
the seat with at least 10 inches between the backwards from the passenger doors on the left, clear ahead” from a stop and “clear left,
steering wheel and the driver’s chest. The air left and right sides of the vehicle and place clear right, clear ahead” while moving. Make
bag should point towards the driver’s chest. cups or cones to mark the side areas visible sure your teen signals and checks mirrors and
The top of the steering wheel should be no to the driver. Ask your teen to measure and blind spots prior to changing speed, position
higher than the top of the driver’s shoulders. record these distances on the next page. or direction. Focus on continuous and smooth
steering wheel movements into the turn, and
• Adjust the seat to maintain heel contact with • With the right foot firmly on the brake, have
the floor to pivot the foot between the brake your teen shift through the gears and explain returning (sliding) the wheel through the hands
and accelerator pedals. Short drivers may when each gear is used. using the same smooth continuous movements
need a seat cushion or pedal extenders to until the vehicle is in the proper position in the
sit in a safe position at least 10 inches from • If the vehicle does not have daylight running lane. Discuss the vehicle’s forward pivot point,
the air bag. lights, turn on the low-beam headlights. which on most cars is even with the driver’s
• Press the brake pedal, release parking brake body. Coach your teen to focus on looking at
• Adjust the head restraint to align with the and shift to drive. and steering towards a target in the center of
center of the back of the driver’s head. your intended path of travel.
Ask the new driver to move the vehicle to dif-
• Adjust the inside mirror so that it frames the
entire rear window and is the primary mirror ferent points in the parking lot using little to no
for viewing traffic behind the vehicle. Adjust
side mirrors to reduce side mirror blind spots
and headlight glare from the rear (see page 14).
Front pivot point Rear pivot point
(middle of car) (center of rear axel)
• Seat belts must be worn properly to prevent
injuries. The lap portion should be snug across
the hips, and the shoulder portion should be
worn snug across the chest away from the neck
and face. Improper use may cause injuries.
• Practice starting the vehicle and adjusting
accessories.
10 2021-2022 GEORGIA 40-HOUR PARENT/TEEN DRIVING GUIDE