
Page 8 - Final GA Parent Teen Driving Guide Updated August 2021
P. 8
INTRODUCTION
• When you drive, set a good example to model. used to introduce and practice the new skills. your teen is using driving skills and evaluat-
Always wear your safety belt. Try to correct Assess the teen’s understanding of the lesson ing the environment. Ask your teen to “read
any unsafe driving habits that you may have objectives during the second half of the ses- the traffic picture aloud” describing anything
acquired; such as rolling through stop signs, sion. Set high standards and evaluate each that may affect your path of travel. For ex-
accelerating through yellow lights, exceeding driving session together. ample, when your teen changes speed, your
the speed limit, driving distracted, etc. teen may say: “red light, mirror, ease foot off
• In a parking lot, practice steering the car with
• If possible, initial instruction should begin your left hand from the passenger seat. accelerator and brake.” Actually, you should
in a car with an automatic transmission so hear “mirror and ease off accelerator” a lot!
that your teen can focus on mastering basic • If you have a car with a parking brake be- • Reinforce the fact that a green light means one
vehicle control maneuvers. tween the seats, practice stopping the car by must scan the intersection before proceeding.
depressing the release button and raising the
• Select driving environments that comple- parking brake. • Encourage your teen not to panic when ap-
ment the lesson objectives and the novice • To prepare yourself to regain speed control in proached by an emergency vehicle and to
driver’s ability. Start in parking lots and the event your teen panics, practice shifting focus on looking for a safe area to pull over.
progress to quiet neighborhoods. Stay in a the transmission from drive to neutral from • Discuss the rules for passing a stopped school
safe, low-risk environment as long as needed the passenger seat. bus with flashing lights.
and, in the beginning, practice using driving
routes familiar to your teen. • Adjust the mirror on the passenger sun visor • Encourage new drivers to change their route
so you can use it as a rearview mirror. If the to avoid making a difficult left turn.
• Check to make sure your teen has their In-
structional Permit and insurance information right outside mirror is properly adjusted to • There is a lot to learn in each lesson, so your
with him or her when operating a vehicle. eliminate blind spot and glare, you can also teen may need extra time to attain adequate
use that mirror to monitor traffic to the rear skill proficiency. Mastery at each level is im-
• Explain the objectives of each lesson and from the passenger seat. (see page 14) portant before moving on to the next lesson.
review what was learned in the last lesson.
• Keep instructions simple and concise. First
• Feedback should be precise and immediate. If direct where to go, and then state the action to • If possible, integrate night driving into each
a mistake is made, repeat the maneuver, tak- take (e.g., “At the next intersection, turn right.”) area of instruction.
ing the driver step by step through the process,
and then allow practice without assistance. • Check mirrors and the space to the sides and
ahead of the vehicle before giving directions.
• Be patient, calm, and alert at all times. Make • Emphasize driving with a large anticipa- Scan this QR
positive remarks frequently. code with your
tion zone by looking at least 15-20 seconds
• Have short, well-planned practice sessions. ahead. Think “what if”; what if a car suddenly mobile device
Thirty minutes is the optimum learning changes lanes, stops, turns, etc. to view the
video online.
period for beginning drivers. The first 30
minutes of each one-hour session should be • Encourage commentary driving! This is the
most valuable tool you have for checking how
Driving in the 21st Century with the road surface allow the vehicle to respond Steering Control
to acceleration, braking, and steering. With this Due to changes in steering ratios and effort
Improvements in auto and highway design narrow margin of safety, it is important to check needed to turn the wheel, steering control re-
also have increased highway safety. Many new tire pressure at least once a month. Proper tire quires a balanced hand position on the lower
cars are equipped with safety features that dic- tread reduces traction loss on wet surfaces by half of the steering wheel.
tate basic vehicle control procedures. Drivers channeling water through the tread. Government
must understand these new technologies and tire ratings are listed on the side of the tire. The Hand Position
the need for basic vehicle maintenance. “AA” rating is the top traction, speed, and load Good posture while driving is important
Tires, wheels, brakes, shock absorbers, drive rating, and “C” is the lowest tire rating. because it allows a better view of hazards and
train, steering and suspension systems function Prior to entering vehicle check tire pressure more control of the vehicle. As a general rule,
together to provide a safe, comfortable ride and using recommended psi located in the door jam when gripping the steering wheel, place your
good gas mileage. of the vehicle. Use a tire pressure gauge to check left hand at the 9 o’clock position and your right
your psi. If your psi is above the number listed hand at the 3 o’clock position on the wheel. Some
Tires on your door jam, let air out until it matches. If manufacturers recommend placing your hands
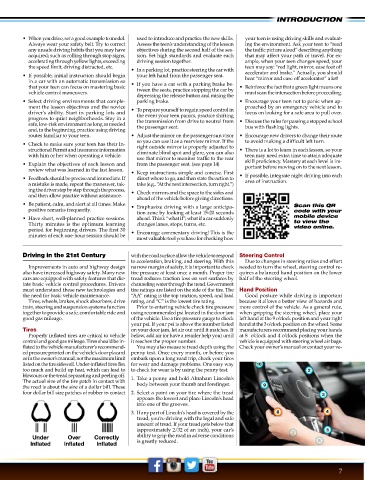
Properly inflated tires are critical to vehicle below, add air (or have a retailer help you) until at 8 o’clock and 4 o’clock positions when the
control and good gas mileage. Tires should be in- it reaches the proper number. vehicle is equipped with steering wheel air bags.
flated to the vehicle manufacturer’s recommend- You may also measure tread depth using the Check your owner’s manual or contact your ve-
ed pressure printed on the vehicle’s door placard penny test. Once every month, or before you
or in the owner’s manual, not the maximum limit embark upon a long road trip, check your tires
listed on the tire sidewall. Under-inflated tires flex for wear and damage problems. One easy way
too much and build up heat, which can lead to to check for wear is by using the penny test.
blowouts or the tread separating and peeling off. 1. Take a penny and hold Abraham Lincoln’s
The actual size of the tire patch in contact with body between your thumb and forefinger.
the road is about the size of a dollar bill. These
four dollar bill size patches of rubber in contact 2. Select a point on your tire where the tread
appears the lowest and place Lincoln’s head
into one of the grooves.
3. If any part of Lincoln’s head is covered by the
tread, you’re driving with the legal and safe
amount of tread. If your tread gets below that
(approximately 2/32 of an inch), your car’s
Under Over Correctly ability to grip the road in adverse conditions
Inflated Inflated Inflated is greatly reduced.
7