Page 980 - Med Plaza and Cancer Center
P. 980

the right connection


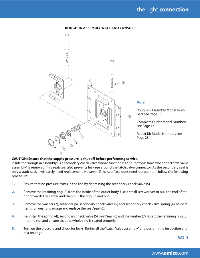
                                         ROUGH-IN ASSEMBLY WALL AND CONSOLE


                                          OXYGEN


                                                                      OXYGEN  2
                                                        1


                                                                                     Note:

                                                                                     Rough-in Assembly Model Num-
                                                                                     bers see Page 15
                                                                                3
                                                                                     Complete Outlet Model Numbers
                                                                                     see Page 16

                                                                                     Repair Kit Model Numbers see
                                                   4                                 Page 23
                                               5
                                            6
                                        7
                                     8
        CAUTION: Ensure that the supply pressure is shut off  before performing service.
        Inside the “Rough-in assembly” is a secondary check valve whose function is to shut off  gas fl ow  when the “Latch-valve
        assembly” is removed. This seat/seal also prevents leakage around the latch valve connector. As the secondary seal is
        only a static seal, it will rarely need replacement. However, if the seat/seal does need replacement, follow the following
        procedure:

        1.     Ensure that no pressure exists in the line by depressing the secondary check valve (5).

        2.     Remove the retaining ring (8) from the inside of the outlet body. Use a small screwdriver to pull the end of the
               ring towards the center and then pull the ring up and out.


        3.     Remove the washer (7), seat/seal (6), secondary check valve (5) and secondary check valve spring (4). Inspect
               items for wear or damage and replace the seat/seal (6).

        4.     Re-install the spring (4), secondary check valve (5), seat/seal (6) and the washer (7). Insert the retaining ring (8)
               into the slot and ensure that the whole ring is seated properly.

        5.     Turn on the pressure and check for leaks. Re-install the “Latch Valve assembly” and perform the inspection and
               test on page 1.
                                                                                                              PAGE   13


                                                                                              www.amico.com
   975   976   977   978   979   980   981   982   983   984   985