Page 975 - Med Plaza and Cancer Center
P. 975

Corporation


                                                                                             Service


        Before performing any maintenance on the Outlet, the appropriate hospital maintenance or engineering personnel
        should be notifi ed. The “Latch-valve assembly” can be removed without interrupting the service, but when servicing
        the “Rough-In assembly” the supply pressure has to be shut off .


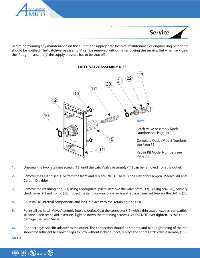
                                                 LATCH VALVE ASSEMBLY DISS

                                                                                      23
                                                                              22
                                                                         21
                                                                  20
                                                         17
                                              13

                                 12


                            16
                                                                                     Note:

                                                                                     Latch-Valve Assembly Model
                                                                                     Numbers see Page 14

                                                                   15                Complete Outlet Model Numbers
                                                                                     see Page 16
                                                              11
                                             Corporation
                                                                                     Repair Kit Model Numbers see
                                             MICO
                                                                                     Page 20


        1.     Unscrew the two retaining screws (12) until the Latch Valve Assembly (11) can be removed from the outlet.

        2.     Remove the O-Ring seal (16) from the front and replace (NOTE: There is no O-Ring for Oxygen, Medical Air and
                       Carbon Dioxide).


        3.     Remove the retaining ring (23) using appropriate  pliers. Remove the valve stem (17), O-Ring seal (20), primary
               check valve (21) and  spring (22). Inspect the items for wear or damage and replace if needed. Replace the O-Ring (20).


        4.     Re-install all internal components and lock in place with the  retaining ring (23).

        5.     Re-install the Latch Valve Assembly into the outlet. Coat the connector (15) with a thin coat of oxygen compatible
               silicone lubricant to aid insertion. Tighten down the retaining screws (12), DO NOT over tighten, as this could
               damage the Latch Valve.


        6.     Connect a gas specifi c adapter to the outlet. The connection should be smooth and hand tightening of the nut
               should be suffi  cient to allow the gas to fl ow without leakage. If not, replace the entire Latch Valve Assembly (11).
        PAGE   8


                  #                  53 ,)34%$
   970   971   972   973   974   975   976   977   978   979   980