
Page 25 - TheDecorativePainter_DP4_Winter_2018
P. 25
BACKGROUND
Sand, seal, sand. Basecoat lid Evergreen. Cut paper to fit lid. Apply a coat of Decou-Page to lid. Position paper on lid and begin pressing down, starting in center and moving out to the edges, using brayer, heavy cardboard, or old credit card. Don’t press too hard so you don’t tear the paper. Be sure edges are secure; add more Decou-Page underneath if necessary. Apply another coat of Decou-Page on top of paper. Dry well. Trace on pattern.
TABLE
Green table covers were popular in the eighteenth century. Apply tape above pattern line and “seal” edge with sealer; dry. Basecoat Evergreen. Note: I did the following step after the wine bottle, book, and mug (not glasses) were painted so I knew their placement. Using #12 dry brush, pick up Evergreen, take excess out on palette, pick up Slate Grey in dirty brush, take out excess, and dry-brush highlights here and there on top right, down toward bottom, coming between book and bottom edge. After all elements are painted in, including glasses, add shading under book, mug, under some areas of glasses with Black Green.
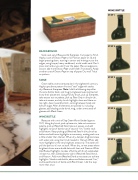
WINE BOTTLE
Basecoat with a mix of Sap Green+Burnt Umber (approx. 10:1). Using dry brush, pick up base mix, take out excess on palette, pick up Bleached Sand, take out excess, and add highlights to top of bottle, top of second “rim,” bottle neck and bottom. Keep picking up Bleached Sand in dirty brush as before and add more highlights as necessary, making each one a little smaller than the last. When dry, dampen brightest areas with water and, using liner brush loaded in Titanium White, add more highlights to the very brightest areas only. The water will pull the paint so it’s not so stark. When dry, re-wet areas where brightest shines are and add dots with liner and Titanium White. Add floated highlights to sides of bottle with brush sideloaded in base mix, then sideload same side in Bleached Sand, blend, and float on. Add more Bleached Sand as necessary to achieve highlights. Shade inside bottle, above and below second “rim,” and toward bottom of bottle with Black Green. I did this step more than once.
STEP 3
WINE BOTTLE STEP 1
STEP 2
STEP 4
STEP 5
