
Page 67 - TheDecorativePainter_DP4_Winter_2018
P. 67
FACE
Paints are added wet-into-wet; more than one coat may be needed. Paint one area at a time, and as you move from one layer/area to another, re-wet with water, blending medium, or the last paint used if necessary. I use paint, so there is brush-mixing.
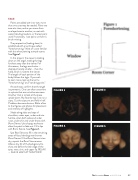
The perspective (looking down) is established with a technique called “foreshortening.” Most of us are familiar with this when painting a simple scene. See Figure 1.
In this project, the viewer is looking down on the angel, making the legs furthest away than the viewer. For this reason, the legs are shorter – disproportionally smaller – than the head, which is nearest the viewer. The length of each portion of the body follows this logic. If you wish
to learn more, look up the terms “foreshortening” and “vanishing point.”
At each step, confirm that the angel is symmetric. One can often see errors in a photo that are not otherwise seen. Another trick is to look at the piece upside down. My favorite way is to run a copy. Cut the copy out and fold in half. Problems become obvious. Refer often to the figures and photos for placement and intensity of highlights.
Shade along sides and tops of shoulders, under eyes, under and into hairline, down both sides and under nose, under chin and under brows with Burnt Sienna. Use choppy strokes to allow the paint to fade out. Fill in lips with Burnt Sienna. See Figure 2.
Use Raw Sienna to fill in the remaining areas of face, blending into the wet Burnt Sienna. If the Burnt Sienna is too dry, repaint the Burnt Sienna areas. Allow a tiny bit of the background to show and define the lash edge of the eyes, nose, chin, and upper lip. RELAX — SHE IS UGLY AT THIS POINT.
FIGURE 2
FIGURE 3
FIGURE 4
FIGURE 5
TheDecorativePainter • WINTER 2018 65
