
Page 28 - DPM3_FallandWinter_2022
P. 28
PAINTED DETAILS
To add the last bit of detail to the design, switch back to your brushes and paint palette. Carefully look over your piece and erase any stray graphite lines (be careful not to erase your colored pencil work). Brush clean.
SETTING YOUR WORK
Before adding the painted details, you’ll need to set your beautiful work, so it isn’t pulled up while working on the finishing touches. This crucial step will allow you to easily clean up any painted mistakes and prevent smearing. You can accomplish this one of two ways. You can either lightly spray your favorite Matte Fixative Spray over your piece OR brush your piece with JoSonja Fast Drying Clear Glaze Medium.
To SPRAY your piece: Take your piece outside and prop it up vertically. Very lightly spray a few light coats of Matte Fixative Spray in different directions over the design. Let dry between coats.
To GLAZE your piece: This is a nice alternative if you’re allergic to the spray or not in a situation where you can spray. Remember there are a few extra precautions you’ll need to pay attention to when working with glazing medium. Glazing medium sets your paint (and penciling) so that it becomes permanent, but it can also smear your work if not used right. Start with a dry 3/4" oval wash OR a 3/4" square wash brush. If your brush is not dry, squeeze the moisture out with a paper towel. A wet brush can cause your pencil work to smear. Evenly load your brush with Fast Drying Clear Glaze Medium and very lightly brush over the surface. It is SUPER, SUPER important that you don’t play with it and go back and forth because it will smear your pencil work. Just an even light coat will do. I start at the top of the piece and work in sections until the paper is completely coated. Let dry. Then add another light coat of the glazing medium. Let the surface dry before adding the painted details.
FINISHING
Use an oval wash brush to finish the watercolor paper with 3-4 light coats of JoSonja Matte Varnish. Let each coat dry before adding another, then let dry completely. You are now ready to adhere your piece onto an Art Plaque OR pop it into
a frame. Various sized Art Blocks are available at ErikaJoanne.com. Before adhering your piece to an Art Plaque, you’ll need to first seal all sides of the wood piece with JoSonja All Purpose Sealer. Let dry and lightly sand. Use a thinned mix of Napthol Crimson + Mustard Seed (1:1) to stain the edges and back of the Art Plaque. Apply it with a flat brush over the edges and back of the plaque. Before the paint dries, use a damp paper towel to remove the excess paint from the plaque. The color should be somewhat transparent. Let dry completely. Use a White pencil to add short diagonal lines along the beveled edge around the plaque. Apply a coat of Fast Drying Clear Glaze Medium to set the pencil work on the plaque. Let dry completely.
26 TheDecorativePainter • FALL/WINTER 2022
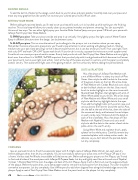
DOTS & SPLATTERS
Mix a few drops of JoSonja Flow Medium with
a mix of Warm White + a teeny tiny touch of Pine Green. Use a stylus to add the dots to the center of the green checks on the hat. Mix a few drops
of Flow Medium with Carbon Black and use a stylus to dot the black checks on the hat. Use a round brush to stroke highlights on the carrot nose with Mustard Seed. Brighten the highlights with a bit of Warm White added to your brush. Mix a few drops of Flow Medium with Warm White and use a small stylus to add the tiny highlight dots to the eyes. Then add the highlight dots to the carrot nose, and various dots to the hat trim (avoid the swirls). Also, dot the ball at the end of the hat, down the sides of the snowman’s body, and between the red stripes on each candy cane. Stroke and dot the detail on each of the snowflakes. Mix a few drops of Flow Medium with Napthol Crimson and use a small stylus to add the dots to the center of each white polka-dot on the scarf. Let dry.
Using Warm White and a splatter brush, apply splatter to the whole piece. Carefully remove any unwanted splatter with a damp cotton swab - be delicate, so you don’t disturb the painted details. Let dry completely.
