
Page 93 - DPM3_FallandWinter_2022
P. 93
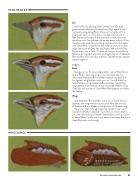
HEAD, BEAK & EYE
  Eye
As the life of a painting often comes from the eyes,
give the most attention to detail here. Reshape the eye if necessary using Lamp Black. Once you’re happy with its shape, use your no. 20/0 liner to sweep a semicircle of
Raw Sienna on the eye. If the eye were a clock, this color would be a thin line between three and seven o’clock. If the line grows too wide for your liking, reshape the inside again with Lamp Black. Once this is dry, from ten to two o’clock, add a semicircle of Grey Sky, and finally, add a dot of Grey Sky at about one o’clock. Outside of the eye, simulate tiny feathers by ringing the bottom and right side with Traditional Burnt Umber and, once dry, add tiny Cool White dots spaced closely together.
STEP 6
Back
Using your no. 3 round, add another coat of Raw Sienna to the Wren’s back and wing if your basecoat was thin.
Add some Traditional Burnt Umber between the back and the lightest wing feathers with your no. 1 round. Add the hint of stripes using Traditional Burnt Umber. The lightest wing feather, from bottom to top, should be Medium Gray, Grey Sky, and a touch of Cool White. Blend gently to soften the feather.
Wings
Use Traditional Burnt Umber and your no. 20/0 liner to separate the wing feathers as pictured. Also add a touch
of Traditional Burnt Umber to the bottom of the back wing
- the one on the bird’s right side that we don’t see - as it would be partially shadowed. If you feel your bird needs it, you may reinforce your feather demarcations with a tiny bit of Lamp Black. Finally, use the photos to add Lamp Black and Cool White dots to the wing.
  WINGS & BACK
   DECORATIVEPAINTERS.ORG 91
