
Page 47 - DPM4_Winter_2021_Flipbook
P. 47
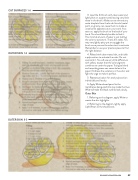
CUT SURFACES 1-6
   OUTER SKIN 1-2
3. Load the #4 brush with clean water and lightly blot on a paper towel, leaving very little water in the brush. Make sure to remove any water droplets from the brush ferrule (metal part), or gravity can cause them to make an unwelcome appearance on your work. As a test run, apply the brush to the back of your hand. You should barely be able to feel it.
This minimal amount of water is just tickling the color to activate it. That’s all it takes. You may very lightly pitty-pat or squiggle the brush once you see the color start to activate. Remember to use your practice piece to find the right balance.
4. Reload with clean water, blot, and tickle a pulp section to activate the color. Do not overwork it. You will see very little difference with yellow, except that the color pigment combines to cover the paper. Trying to blend and reworking areas can cause holes in the paper. Embrace the variations in the color and fight the urge to make it perfect.
5. Repeat activation for each pulp section individually and let dry.
6. Apply White colored pencil to the membranes being careful to stay inside the lines. White will make the black outlines look cloudy.
Outer Skin
1. Referring to the diagram, apply White to create the skin highlights.
2. Referring to the diagram, lightly apply Light Brown to the shade areas.
  OUTER SKIN 3-5
  DECORATIVEPAINTERS.ORG 45
