
Page 48 - DPM4_Winter_2021_Flipbook
P. 48
3. Apply Yellow to each skin section pressing a little harder than on the pulp. Work around the highlight and apply color on top of the shade areas to begin the blending.
4. Load the #8 brush with clean water, blot as before. Start activating the Yellow around the highlight. When you get near the shaded area, straddle the two colors to blend the joint. Do not go back into the yellow area with a dirty brush, or you will muddy the color. This process tints the paper, making a background for an additional layer during the evaluation stage.
5. Shadows: Referring to the diagram, apply Light Brown to create the cast shadows. (Shadows are not included on the pattern because I did not want a dark line outlining them.) Using your #4 brush, carefully activate the shadows and dry.
Evaluate Your Lemon Meringue Pie Recipe
Decide how bright you want your lemons. I suggest:
1. You leave the pulp sections as they are.
2. Apply Yellow over all skin areas. Do not activate. Applying additional color dry, creates a texture that adds depth and interest and deepens the color.
3. If you’d like more profound contrast, apply Light Brown lightly to the shade and shadow areas. Do not activate.
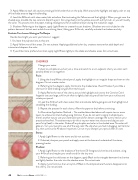
CHERRIES
Change your water.
It’s best to complete one cherry at a, time and switch to a non-adjacent cherry so colors can’t possibly bleed or run together.
Fruit:
1. Using the sharp White colored pencil, apply the highlight in an irregular shape as shown on the diagram. Do not create circles.
2. Referring to the diagram, apply Carmine to the shaded area. (See #7 below if you’d like a shortcut for dark shading using another technique.)
3. Apply Red to the rest of the cherry around the highlight and next to the Carmine. Don’t forget to use your large, soft brush often to lightly clear any pencil bits from your surface and rotate your pencil.
4. Load the #4 brush with clean water, blot and activate before going around the highlight and straddling the shading.
5. Repeat the process for each cherry. Allow the paper to dry before continuing.
6. Alternative Application Method – The method described above will require two or more layers to achieve minimal shading using Carmine. If you do not want to apply multiple layers, there’s another way to use your watercolor pencils for denser coverage. Be sure to test on your practice sheet first. The easiest way to do this is to pour water into a saucer and dip just your pencil’s tip (lead) in the water. Shake off any droplets and color in the shaded area. The color will glide on. Turn your pencil to use all of the wet color. Re-dip when you feel it dragging. Let Carmine dry, then continue to #3 above. Important: Do not try to sharpen your pencil when it’s wet.
Stems:
1. Apply Light Brown to the stems and do not activate.
2. If desired, sharpen your pencil and apply more at the base and underside of the stems, pressing harder.
Shadows:
1. Apply Light Brown to the shadows of the three (3) foreground cherries and activate, using your #4 brush and maybe your small round for the tiny one.
2. Referring to the solid areas on the diagram, apply Black to the triangles between the cherries and lightly feather the color into the shadow areas. Do not activate.
3. Apply more Carmine, then a tiny bit of Black in the dimple where the stem disappears into the cherry. Do not activate.
46 TheDecorativePainter • WINTER 2021
