
Page 58 - DPM4_Winter_2021_Flipbook
P. 58
CUP, SAUCER & SPOON
CUP AND SAUCER
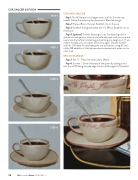
STEP 1
STEP 2
Step 1. No. 8 Sharpie in the larger areas, and No. 0 in the cup handle. Follow the colormap for placement. Blend as you go.
Step 2. Place coffee in the cup. Establish rim on the cup.
Step 3. Establish the lightest areas with VL. Blend. Establish rim on
the saucer.
Step 4. (optional) Transfer lettering to cup. The lettering can be etched into wet paint or to be on the safe side; wait until your cup and saucer are dry before transferring and painting any design on it. If you make a mistake, you can wipe it off and try again. Use the Scroller and No. 0 Sharpie for decorating the cup and saucer, using AC with a little WB added to it. Add shines where indicated with a star on the color map.
SPOON HANDLE
Step 3. No. 0 – Place the silver colors. Blend.
Step 4. Scroller – Show thickness of the spoon by adding a very
thin line of TW along the side edge. Etch in a Monogram! (Optional) STEP 4
STEP 3
56 TheDecorativePainter • WINTER 2021
STEP 4
