
Page 57 - DPM4_Winter_2021_Flipbook
P. 57
FRENCH PRESS
STEP 1
NAPKIN
Step 1. If you have not done so yet, transfer the design to the napkin.
Step 2. Use a variety of your blue mixes to fill in the design. Let dry before coming
STEP 2
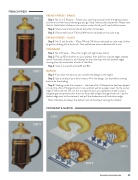
FRENCH PRESS – BRASS
Step 1. No. 0 or 2 Sharpie – Follow your colormap and start with the lightest colors and work out from there, blending as you go. Step 1 shows color placement. Please note that for the little bit of silver on the rod just under the lid, you’ll use the Silver mixes.
Step 2. Shows how the brass should look after it’s blended.
Step 3. Place small tints of CW and WW where indicated on the color map.
FRENCH PRESS – GLASS
Step 3. No. 0 and Scroller – Place TW and CW where indicated on color map. Soften by gently rubbing with a dry brush. Then add shines where indicated with a star.
CROISSANT
Step 1. No. 6 Sharpie – Place Very Light and Light areas, blend.
Step 2. Pick up RS and soften on your palette, then pull from outside edges towards center from both directions, as indicated on the colormap, with the darkest edges coming from the undersides of each of the folds.
Step 3. Toast it more with a little BS and BU.
back to do the shading.
Step 3. Shading under the croissant – side load a No. 2 Sharpie that has been dipped in turp, Dip a No. 2 Sharpie brush in turp, and blot well on a paper towel. Tip the corner edge of the brush into CB, run this a couple times on your palette to make sure you are getting a transparent color that runs from dark to light through the brush. Lay the darkest edge next to the croissant, and pull the shadow around the bottom edge.
Note: Shadows are always the darkest next to the object casting the shadow!
CROISSANT & NAPKIN
STEP 1 STEP 3
STEP 3
DECORATIVEPAINTERS.ORG 55
STEP 2
