
Page 224 - 2018 National Home Improvement
P. 224
2018 National Home Improvement Estimator, All Rights Reserved Page 182
Making Changes
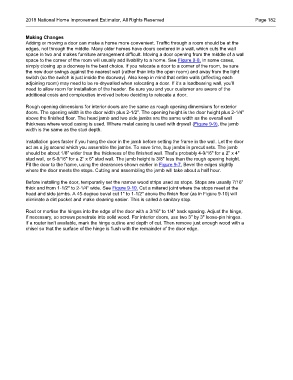
Adding or moving a door can make a home more convenient. Traffic through a room should be at the
edges, not through the middle. Many older homes have doors centered in a wall, which cuts the wall
space in two and makes furniture arrangement difficult. Moving a door opening from the middle of a wall
space to the corner of the room will usually add livability to a home. See Figure 9-8. In some cases,
simply closing up a doorway is the best choice. If you relocate a door to a corner of the room, be sure
the new door swings against the nearest wall (rather than into the open room) and away from the light
switch (so the switch is just inside the doorway). Also keep in mind that entire walls (affecting each
adjoining room) may need to be re-drywalled when relocating a door. If it’s a loadbearing wall, you’ll
need to allow room for installation of the header. Be sure you and your customer are aware of the
additional costs and complexities involved before deciding to relocate a door.
Rough opening dimensions for interior doors are the same as rough opening dimensions for exterior
doors. The opening width is the door width plus 2-1/2". The opening height is the door height plus 2-1/4"
above the finished floor. The head jamb and two side jambs are the same width as the overall wall
thickness where wood casing is used. Where metal casing is used with drywall (Figure 9-9), the jamb
width is the same as the stud depth.
Installation goes faster if you hang the door in the jamb before setting the frame in the wall. Let the door
act as a jig around which you assemble the jambs. To save time, buy jambs in precut sets. The jamb
should be about 1/8" wider than the thickness of the finished wall. That’s probably 4-9/16" for a 2" x 4"
stud wall, or 6-9/16" for a 2" x 6" stud wall. The jamb height is 3/8" less than the rough opening height.
Fit the door to the frame, using the clearances shown earlier in Figure 9-7. Bevel the edges slightly
where the door meets the stops. Cutting and assembling the jamb will take about a half hour.
Before installing the door, temporarily set the narrow wood strips used as stops. Stops are usually 7/16"
thick and from 1-1/2" to 2-1/4" wide. See Figure 9-10. Cut a mitered joint where the stops meet at the
head and side jambs. A 45-degree bevel cut 1" to 1-1/2" above the finish floor (as in Figure 9-10) will
eliminate a dirt pocket and make cleaning easier. This is called a sanitary stop.
Rout or mortise the hinges into the edge of the door with a 3/16" to 1/4" back spacing. Adjust the hinge,
if necessary, so screws penetrate into solid wood. For interior doors, use two 3" by 3" loose-pin hinges.
If a router isn’t available, mark the hinge outline and depth of cut. Then remove just enough wood with a
chisel so that the surface of the hinge is flush with the remainder of the door edge.