
Page 47 - Computeractive - January 2, 2018 UK
P. 47
M a k e Offic e Bet t er Expert tips f or every program
EXCEL
Customise y our s preadsheet’s cells a nd change its f ont
Excel’s c ells are w hite with
black b orders, b ut there a re
other c ell s tyles you c an choose
to breathe l ife i nto y our s preadsheet.
To see t hese styles, h ighlight a ny
data in your spreadsheet, click t he
‘Cell s tyles’ d ropdown m enu i n t he
Styles section of the H ome t ab, t hen
move your cursor to one o f t he options
to see h ow your data looks. I f y ou don’t
like a ny of these styles, i t’s e asy t o
create your own.
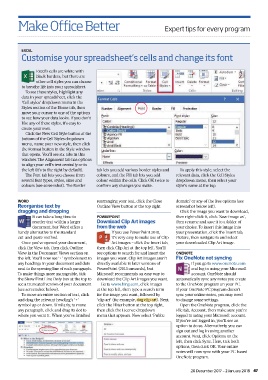
Click t he New Cell Style b utton a t t he
bottom of the C ell S tyles dropdown
menu, n ame y our n ew style, t hen c lick
the F ormat button i n t he Style w indow
that opens. Y o u’ll see s ix tabs in this
window. Th e A lignment tab h as options
to align y our c ell’s t ext c entrally or to
the l eft ( it’s to the r ight b y d efault). tab l ets you a dd various border styles and To apply t his s tyle, s elect the
The Font tab l ets you c hoose f rom colours, a nd the F ill tab l ets you a dd relevant data, c lick the C ell S tyles
several f ont t ypes, s tyles, s izes and colour w ithin t he cells. C lick OK twice t o dropdown menu, t hen s elect your
colours (see screenshot). The Border confirm any c hanges you m ake. style’s n ame a t t he top.
WORD rearranging your text, click t he Close domain’ or any o f t he free options (see
Reorganise text by Outline V iew b utton a t t he top r ight. screenshot below l eft).
dragging a nd dropping Click t he image y ou want to download,
It can take a l ong t ime t o POWERPOINT then right-click i t, click ‘ Save image a s’,
reorder t ext w ithin a l arger Download Clip A rt images then rename and s ave i t t o a f older o f
document, b ut Word offers a from the w eb your choice. To insert this image i nto
handy a lternative to the s tandard If you u se PowerPoint 2010, your presentation, c lick the I nsert tab,
cut-and-paste method. it’s very easy to make use o f C lip Picture, t hen n avigate t o a nd select
Once you’ve opened your document, Art i mages – c lick the I nsert tab, your downloaded Clip Art i mage.
click t he View tab, then click O utline then click C lip A rt at the t op left. Y ou’ll
View in the D ocument V iews section on see o ptions to search for a nd insert the ONENOTE
the l eft. Y o u’ll now s ee ‘+’ symbols n ext t o images you w ant. Clip Art i mages a ren’t Fix O neNote not s yncing
any h eadings in your document and d ots directly a vailable in later v ersions of If you g o t o www.onenote.com
next to the o pening line o f e ach p aragraph. PowerPoint (2013 o nwards), but and l og in using y our M icrosoft
To make things more manageable, t ick Microsoft recommends an easy way to account, O neNote should
the S how F irst Line Only b ox at the t op to download the C lip A rt images you w ant. automatically s ync a ny notes you c reate
see a t runcated version of your document Go to www.bing.com, c lick Images to the O neNote program o n y our P C.
(see screenshot below). at the t op left, t hen t ype a s earch t erm If your OneNote P C p rogram doesn’t
To move an entire section of text, click for t he image y ou want, f ollowed b y sync your online n otes, y ou may n eed
and d rag t he relevant heading’s ‘ +’ ‘clip a rt’ ( for e xample, d og clip art). Next, to change some s ettings.
symbol up or down. S imilarly, t o m ove click t he Filter button a t t he top r ight, Open the O neNote program, click t he
any p aragraph, c lick and d rag i ts dot t o then click t he Licence dropdown File tab, Account, t hen m ake s ure y ou’re
where y ou want it. W hen y ou’ve fi nished menu that appears. N ow select ‘Public logged in using y our M icrosoft account.
If you’re not logged in, y ou’ll s ee an
option to do so. A lternatively, y ou can
sign out and l og in using a nother
account. N ext, click O ptions on the
left, t hen c lick Sync. H ere, tick b oth
options, t hen c lick OK. Y our o nline
notes will now s ync w ith y our P C-based
OneNote p rogram.
20 December 2017 – 2 J anuary 2018 47