
Page 83 - BBC Sky at Night - September 2017 UK
P. 83
SKILLS HOW TO SEPTEMBER 83
STEP BY STEP
! The steering mechanism and the rigid
handle; for a soft handle, use some rope
drilling. Ideally the wheels and jacking
points should be as close to the tripod
feet as possible. For wheels, we chose
150mm plastic ones with rubber tyres. STEP 1 STEP 2
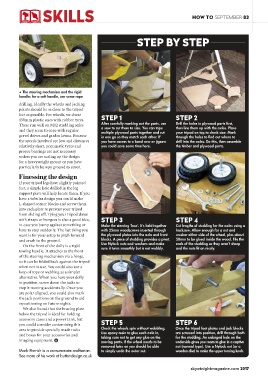
After carefully marking out the parts, use Drill the holes in plywood parts first,
These run well on M12 studding axles
a saw to cut them to size. You can tape then line them up with the axles. Place
and they seem to cope with regular
multiple plywood parts together and cut your tripod on top to check size. Mark
gravel drives and garden lawns. Because in one go so they match each other. If through the holes to find out where to
the speeds involved are low and distances you have access to a band saw or jigsaw drill into the axles. Do this, then assemble
relatively short, pneumatic tyres and you could save some time here. the timber and plywood parts.
proper bearings are not necessary
unless you are scaling up the design
for a heavyweight mount or you have
particularly bumpy ground to cover.
Finessing the design
If your tripod legs have slightly pointed
feet, a simple hole drilled in the leg
support plate will help locate them. If you
have a tubular design you could make
L-shaped corner blocks and screw them
into each plate to prevent your tripod
from sliding off. Tying your tripod down
with straps or bungees is also a good idea, STEP 3 STEP 4
in case you bump against something or Make the steering ‘box’. It’s held together Cut lengths of studding for the axles using a
have to stop suddenly. The last thing you with 25mm woodscrews inserted through hacksaw. Allow enough for a nut and
want is for your setup to pitch forward the plywood plates into the axle and front washer either side of the wheel, plus about
and crash to the ground. blocks. A piece of studding provides a pivot. 50mm to be glued inside the wood. File the
Use Nylock nuts and washers and make ends of the studding so they aren’t sharp
On the front of the dolly is a rigid
sure it turns smoothly but is not wobbly. and the nuts fit on nicely.
towing handle. It attaches to the front
of the steering mechanism via a hinge,
so it can be folded back against the tripod
when not in use. You could also use a
loop of rope or webbing as a simpler
alternative. When you have your dolly
in position, screw down the jacks to
stop it moving accidentally. Once you
are polar aligned, you could also mark
the jack positions on the ground to aid
repositioning on future nights.
We also found that the bracing plate
below the tripod is ideal for holding
accessory cases and a power tank, but
you could consider customising this STEP 5 STEP 6
area to provide specially made racks Check the wheels spin without wobbling. Once the tripod foot plates and jack blocks
Use epoxy resin to glue each axle in, are screwed into position, drill through both
and boxes for your accessories and
taking care not to get any glue on the for the studding. An enlarged hole on the
imaging equipment. S
moving parts. If the wheel needs to be underside gives you room to glue in a captive
removed later on you should be able nut (normal type). Use a Nylock nut (or a
Mark Parrish is a consummate craftsman. to simply undo the outer nut. wooden disc) to make the upper turning knob.
See more of his work at buttondesign.co.uk
skyatnightmagazine.com 2017