
Page 85 - BBC Sky at Night - September 2017 UK
P. 85
SKILLS IMAGE PROCESSING SEPTEMBER 85
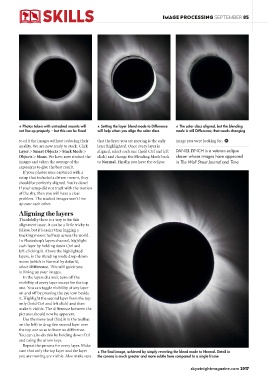
! Photos taken with untracked mounts will ! Setting the layer blend mode to Difference ! The solar discs aligned, but the blending
not line up properly – but this can be fixed will help when you align the solar discs mode is still Difference; that needs changing
to edit the images without reducing their that the layer you are moving is the only image you were looking for. S
quality. We are now ready to stack. Click layer highlighted. Once every layer is
Layer > Smart Objects > Stack Mode > aligned, select each one (hold Ctrl and left DANIEL LYNCH is a veteran eclipse
Objects > Mean. We have now stacked the click) and change the Blending Mode back chaser whose images have appeared
images and taken the average of the to Normal. Finally, you have the eclipse in The Wall Street Journal and Time
exposures to give the best result.
If your photos were captured with a
setup that included a driven mount, they
should be perfectly aligned. You’re done!
If your setup did not track with the motion
of the sky, then you will have a clear
problem. The stacked images won’t line
up over each other.
Aligning the layers
Thankfully there is a way to fix this
alignment issue. It can be a little tricky to
follow, but it’s easier than lugging a
tracking mount halfway across the world.
In Photoshop’s layers channel, highlight
each layer by holding down Ctrl and
left-clicking it. Above the highlighted
layers, in the Blending mode drop-down
menu (which is Normal by default),
select Difference. This will guide you
in lining up your images.
In the layers channel, turn off the
visibility of every layer except for the top
one. You can toggle visibility of any layer
on and off by pressing the eye icon beside
it. Highlight the second layer from the top
only (hold Ctrl and left click) and then
make it visible. The difference between the
pictures should now be apparent.
Use the move tool (find it in the toolbar
on the left) to drag this second layer over
the top one so as to leave no difference.
You can also do this by holding down Ctrl
and using the arrow keys.
Repeat the process for every layer. Make
sure that only the top layer and the layer ! The final image, achieved by simply reverting the blend mode to Normal. Detail in
you are moving are visible. Also make sure the corona is much greater and more subtle here compared to a single frame
skyatnightmagazine.com 2017