Page 99 - Smart Photography
P. 99

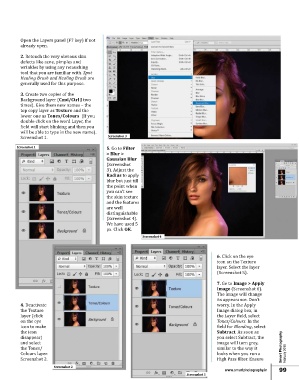
Open the Layers panel (F7 key) if not
         already open.

         2. Retouch the very obvious skin
         defects like acne, pimples and
         wrinkles by using any retouching
         tool that you are familiar with. Spot
         Healing Brush and Healing Brush are
         generally used for this purpose.

         3. Create two copies of the
         Background layer (Cmd/Ctrl J two
         times). Give them new names – the
         top copy layer as Texture and the
         lower one as Tones/Colours  (If you
         double click on the word Layer, the
         field will start blinking and then you
         will be able to type in the new name).
                                             Screenshot 3
         Screenshot 1.
        Screenshot 1                        5. Go to Filter
                                            > Blur >
                                            Gaussian Blur
                                            (Screenshot
                                            3). Adjust the
                                            Radius to apply
                                            blur but just till
                                            the point when
                                            you can’t see
                                            the skin texture
                                            and the features
                                            are well
                                            distinguishable
                                            (Screenshot 4).
                                            We have used 5
                                            px. Click OK.
                                                           Screenshot 4


                                                                                         6. Click on the eye
                                                                                         icon on the Texture
                                                                                         layer. Select the layer
                                                                                         (Screenshot 5).
                                                                                         7. Go to Image > Apply
                                                                                         Image (Screenshot 6).
                                                                                         The image will change
                                                                                         its appearance. Don’t
         4. Deactivate                                                                   worry. In the Apply
         the Texture                                                                     Image dialog box, in
         layer (click                                                                    the Layer field, select
         on the eye                                                                      Tones/Colours. In the
         icon to make                                                                    field for Blending, select
         the icon                                                                        Subtract. As soon as
         disappear)                                                                      you select Subtract, the
         and select                                                                      image will turn grey,
         the Tones/                                                                      similar to the way it      Smart Photography
         Colours layer.                                                                  looks when you run a        February 2018
         Screenshot 2.                                                                   High Pass filter. Ensure
                       Screenshot 2
                                                                                             www.smartphotography.in  99
                                                                             Screenshot 5
   94   95   96   97   98   99   100   101   102   103   104