
Page 93 - An Introduction to Laser Tattoo Removal
P. 93
Calibration – what does that mean?
Figure 45: A laser meter
Chapter 2 – Fundamentals of Laser Tattoo Removal v1.0
When you fire your laser, how do you know how much energy or fluence is actually coming out of it?
Unless, it has been properly calibrated, you don’t!
It’s just like your speedometer in your car – it has to be calibrated so that it displays the correct speed as you drive. This is done by the manufacturers in their factories, before it goes into your car.
Unfortunately, many lasers are NOT calibrated before they leave the factory. As a consequence, when the trigger is pulled, the operator cannot know what is striking the skin!
The only way to remedy this is to calibrate your laser. This requires careful measurements of the laser energy, at a number of input levels, with the corresponding spot diameters measured on burn paper (or a dark photo in a magazine!). Here’s a video showing the calibration process.
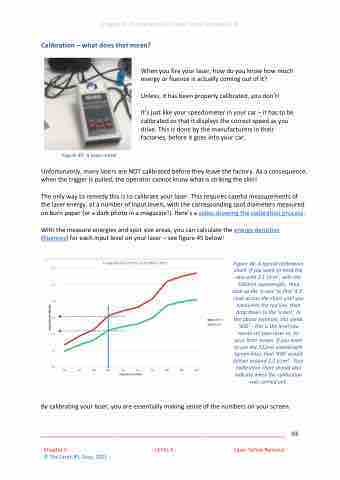
With the measure energies and spot size areas, you can calculate the energy densities (fluences) for each input level on your laser – see figure 45 below:
Figure 46: A typical calibration chart. If you want to treat the skin with 3.1 J/cm2, with the 1064nm wavelength, then look up the ‘y-axis’ to find ‘3.1’. Look across the chart until you encounter the red line, then drop down to the ‘x-axis’. In the above example, this yields ‘400’ – this is the level you would set your laser to, on your laser screen. If you want to use the 532nm wavelength (green line), then ‘400’ would deliver around 2.2 J/cm2. Your calibration chart should also indicate when the calibration was carried out.
By calibrating your laser, you are essentially making sense of the numbers on your screen. ________________________________________________________________________ 93
Chapter 2 LEVEL A Laser Tattoo Removal
© The Laser-IPL Guys, 2021
