
Page 1174 - Adams and Stashak's Lameness in Horses, 7th Edition
P. 1174
1140 Chapter 11
VetBooks.ir
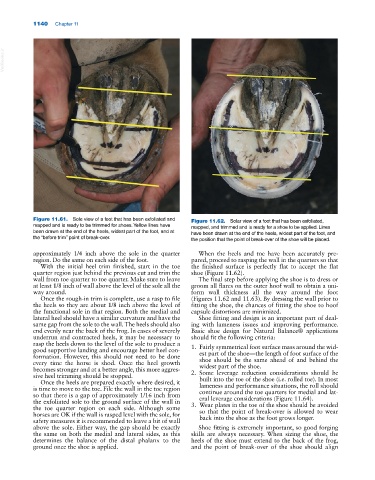
Figure 11.61. Sole view of a foot that has been exfoliated and Figure 11.62. Solar view of a foot that has been exfoliated,
mapped and is ready to be trimmed for shoes. Yellow lines have mapped, and trimmed and is ready for a shoe to be applied. Lines
been drawn at the end of the heels, widest part of the foot, and at have been drawn at the end of the heels, widest part of the foot, and
the “before trim” point of break‐over. the position that the point of break‐over of the shoe will be placed.
approximately 1/4 inch above the sole in the quarter When the heels and toe have been accurately pre
region. Do the same on each side of the foot. pared, proceed to rasping the wall in the quarters so that
With the initial heel trim finished, start in the toe the finished surface is perfectly flat to accept the flat
quarter region just behind the previous cut and trim the shoe (Figure 11.62).
wall from toe quarter to toe quarter. Make sure to leave The final step before applying the shoe is to dress or
at least 1/8 inch of wall above the level of the sole all the groom all flares on the outer hoof wall to obtain a uni
way around. form wall thickness all the way around the foot
Once the rough‐in trim is complete, use a rasp to file (Figures 11.62 and 11.63). By dressing the wall prior to
the heels so they are about 1/8 inch above the level of fitting the shoe, the chances of fitting the shoe to hoof
the functional sole in that region. Both the medial and capsule distortions are minimized.
lateral heel should have a similar curvature and have the Shoe fitting and design is an important part of deal
same gap from the sole to the wall. The heels should also ing with lameness issues and improving performance.
end evenly near the back of the frog. In cases of severely Basic shoe design for Natural Balance® applications
underrun and contracted heels, it may be necessary to should fit the following criteria:
rasp the heels down to the level of the sole to produce a
good supportive landing and encourage better heel con 1. Fairly symmetrical foot surface mass around the wid
est part of the shoe—the length of foot surface of the
formation. However, this should not need to be done
every time the horse is shod. Once the heel growth shoe should be the same ahead of and behind the
widest part of the shoe.
becomes stronger and at a better angle, this more aggres
sive heel trimming should be stopped. 2. Some leverage reduction considerations should be
built into the toe of the shoe (i.e. rolled toe). In most
Once the heels are prepared exactly where desired, it
is time to move to the toe. File the wall in the toe region lameness and performance situations, the roll should
continue around the toe quarters for medial and lat
so that there is a gap of approximately 1/16 inch from
eral leverage considerations (Figure 11.64).
the exfoliated sole to the ground surface of the wall in 3. Wear plates in the toe of the shoe should be avoided
the toe quarter region on each side. Although some
horses are OK if the wall is rasped level with the sole, for so that the point of break‐over is allowed to wear
back into the shoe as the foot grows longer.
safety measures it is recommended to leave a bit of wall
above the sole. Either way, the gap should be exactly Shoe fitting is extremely important, so good forging
the same on both the medial and lateral sides, as this skills are always necessary. When sizing the shoe, the
determines the balance of the distal phalanx to the heels of the shoe must extend to the back of the frog,
ground once the shoe is applied. and the point of break‐over of the shoe should align