
Page 1175 - Adams and Stashak's Lameness in Horses, 7th Edition
P. 1175
Foot Care and Farriery 1141
closely with the break‐over line marked on the foot. The
foot surface of the shoe should be divided equally
VetBooks.ir quarters of the shoe should fit to the groomed toe quar
around the WPOTF (Figures 11.64 and 11.65). The toe
ters of the foot, and the widest part of the shoe must
align with the WPOTF.
When shaping the heels, they should have a gradual bend
that follows the contour of the hoof, with the shoe becoming
slightly wider than the heels as they progress from the
widest part back. The finished heel of the shoe should be
around 1/8 inch wider than the heel at the buttress.
The general shape of the shoe should be round on the
foot surface with a slight boldness to the toe. However,
the toe quarters of the shoe should maintain a width
that is basically the same as the heels, meaning the toe
quarters and heels should form a box (Figure 11.64).
Nailing on shoes and finishing the foot is basically the
same as in any good conventional shoeing job. A quality
nailing pattern with three or possibly four nails/side is gen
erally required. Once the nails are clinched, grooming the
wall is minimal, because the flares have been dressed prior
to fitting the shoe. If there is any amount of toe that sticks
out over the front of the shoe, simply position the rasp at a
30° angle and undercut the toe slightly (Figure 11.65).
Figure 11.63. Lateral view of a foot in which the dorsal hoof wall
has been groomed to a flat plane from the coronary band to the
ground surface. All noticeable flares have been removed and After
uniform wall thickness has been achieved (as seen in Figure 11.62).
Breakover
Before
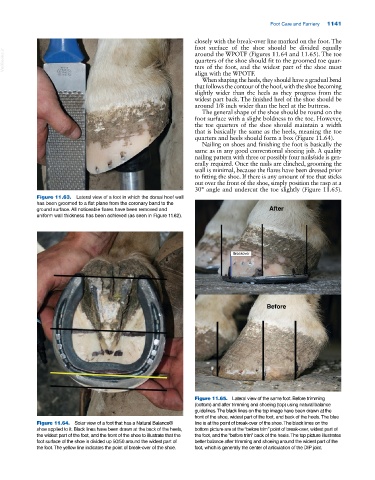
Figure 11.65. Lateral view of the same foot. Before trimming
(bottom) and after trimming and shoeing (top) using natural balance
guidelines. The black lines on the top image have been drawn at the
front of the shoe, widest part of the foot, and back of the heels. The blue
Figure 11.64. Solar view of a foot that has a Natural Balance® line is at the point of break‐over of the shoe. The black lines on the
shoe applied to it. Black lines have been drawn at the back of the heels, bottom picture are at the “before trim” point of break‐over, widest part of
the widest part of the foot, and the front of the shoe to illustrate that the the foot, and the “before trim” back of the heels. The top picture illustrates
foot surface of the shoe is divided up 50/50 around the widest part of better balance after trimming and shoeing around the widest part of the
the foot. The yellow line indicates the point of break‐over of the shoe. foot, which is generally the center of articulation of the DIP joint.