
Page 73 - Casting of Angels- Dave Parvin
P. 73
69
By the way, if you are planning on making a S.M., I innies by filling the holes with either sculpting wax or oil
would suggest that you use plaster for the initial casting and based clay. I prefer wax for very small repairs and clay for
not hydrocal or Hydro-Stone which are much harder, making larger ones. As long as the plaster has dried out to the point
trimming and repairing more difficult. I use Regular Dental that it no longer
Plaster but Number One Molding Plaster or Pottery Plaster
are also good choices. All capture detail excellently yet are
soft enough for easy working.
The next step, repairing any imperfections can take
from as little as a half hour to several hours depending on
how flawless the casting. The very first thing I do is trim the
back edges of the torso so that it will hang flat against a wall.
I try to do this and trim the ends of the arms and legs the
same day that the plaster cast is made and still soft. There is a
tool that can be very useful. It looks like an elongated pair of
tile cutters. (Photograph #2) is actually used to trim horse
hooves. This inexpensive tool is available at any horse tack
supplier. I do the bulk of the trimming with it and finish off
with a utility knife or box cutter. Remember, the casting
mostly is just a series of tricks and the more you know, the
easier it is.
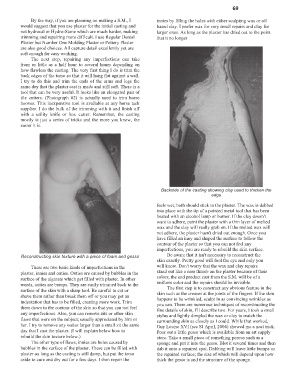
Backside of the casting showing clay used to thicken the
edge
feels wet, both should stick to the plaster. The wax is dabbed
into place with the tip of a pointed metal tool that has been
heated with an alcohol lamp or burner. If the clay doesn't
want to adhere, paint the plaster with a thin layer of melted
wax and the clay will really grab on. If the melted wax will
not adhere, the plaster hasn't dried out enough. Once you
have filled an inny and shaped the surface to follow the
contour of the plaster so that you can not feel any
imperfections, you are ready to rebuild the skin surface.
Reconstructing skin texture with a piece of foam and gesso Be aware that it isn't necessary to reconstruct the
skin exactly. Pretty good will fool the eye and only you
There are two basic kinds of imperfections in the will know. Don't worry that the wax and clay repairs
plaster, innies and outies. Outies are caused by bubbles in the stand out like a sore thumb on the plaster because of their
surface of the alginate which get filled with plaster. In other colors, the end product cast from the S.M. will be of a
words, outies are bumps. They are easily trimmed back to the uniform color and the repairs should be invisible.
The first step is to construct any obvious feature in the
surface of the skin with a sharp tool. Be careful to cut or skin such as the creases at the joints of the fingers. If the skin
shave them rather than break them off or you may get an happens to be wrinkled, sculpt in as convincing wrinkles as
indentation that has to be filled, creating more work. Trim you can. There are numerous techniques of reconstructing the
them down to the contour of the skin so that you can not feel fine details of skin, I'll describe two. For years, I took a small
any imperfections. Also, you can remove zits or other skin stylus and lightly dimpled the wax or clay to match the
flaws that were on the subject; usually appreciated by him or surrounding skin as closely as I could. While that worked,
her. I try to remove any outies larger than a small zit the same Guy Louise XVI (see SJ April, 2004) showed me a neat trick.
day that I cast the plaster. (I will explain below how to Pour out a little gesso which is available from an art supply
rebuild the skin texture below.) store. Take a small piece of something porous such as a
The other type of flaws, innies are holes caused by sponge and put it into the gesso. Blot it several times and then
bubbles in the surface of the plaster. These can be filled with dab it onto a repaired spot. Dabbing will leave little bumps on
plaster as long as the casting is still damp, but put the torso the repaired surface; the size of which will depend upon how
aside to cure and dry out for a few days. I then repair the thick the gesso is and the structure of the sponge.