
Page 142 - Divyank Tyagi
P. 142
108 | ChaPTer 4 Configuring TemplaTes and sTandards
We’ll explain these methods in greater detail throughout this chapter. For now, know that
you can save the completed settings as a new project template (with the filename extension .rte)
and use these templates whenever you start a new project. You can create templates by using
a completely blank project, by saving an existing project as a template, or by using one of the
default templates provided with the Revit installation.
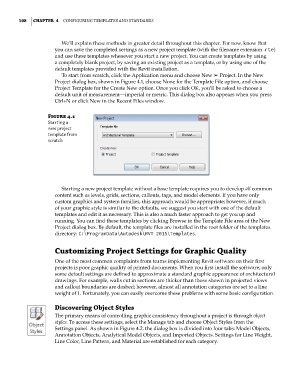
To start from scratch, click the Application menu and choose New ➢ Project. In the New
Project dialog box, shown in Figure 4.1, choose None for the Template File option, and choose
Project Template for the Create New option. Once you click OK, you’ll be asked to choose a
default unit of measurement—imperial or metric. This dialog box also appears when you press
Ctrl+N or click New in the Recent Files window.
Figure 4.1
starting a
new project
template from
scratch
Starting a new project template without a base template requires you to develop all common
content such as levels, grids, sections, callouts, tags, and model elements. If you have only
custom graphics and system families, this approach would be appropriate; however, if much
of your graphic style is similar to the defaults, we suggest you start with one of the default
templates and edit it as necessary. This is also a much faster approach to get you up and
running. You can find these templates by clicking Browse in the Template File area of the New
Project dialog box. By default, the template files are installed in the root folder of the templates
directory: C:\ProgramData\Autodesk\RVT 2015\Templates.
Customizing Project Settings for Graphic Quality
One of the most common complaints from teams implementing Revit software on their first
projects is poor graphic quality of printed documents. When you first install the software, only
some default settings are defined to approximate a standard graphic appearance of architectural
drawings. For example, walls cut in sections are thicker than those shown in projected views
and callout boundaries are dashed; however, almost all annotation categories are set to a line
weight of 1. Fortunately, you can easily overcome these problems with some basic configuration.
Discovering Object Styles
The primary means of controlling graphic consistency throughout a project is through object
styles. To access these settings, select the Manage tab and choose Object Styles from the
Settings panel. As shown in Figure 4.2, the dialog box is divided into four tabs: Model Objects,
Annotation Objects, Analytical Model Objects, and Imported Objects. Settings for Line Weight,
Line Color, Line Pattern, and Material are established for each category.
c04.indd 108 5/3/2014 10:36:52 AM