
Page 545 - Divyank Tyagi
P. 545
|
Creating siMPle Curtain Walls 511
Placing Corner Mullions
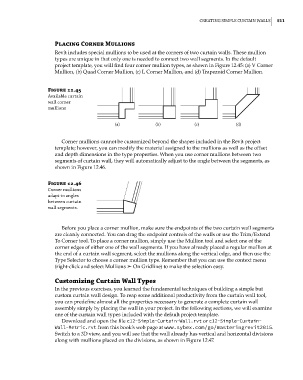
Revit includes special mullions to be used at the corners of two curtain walls. These mullion
types are unique in that only one is needed to connect two wall segments. In the default
project template, you will find four corner mullion types, as shown in Figure 12.45: (a) V Corner
Mullion, (b) Quad Corner Mullion, (c) L Corner Mullion, and (d) Trapezoid Corner Mullion.
Figure 12.45
available curtain
wall corner
mullions
(a) (b) (c) (d)
Corner mullions cannot be customized beyond the shapes included in the Revit project
template; however, you can modify the material assigned to the mullions as well as the offset
and depth dimensions in the type properties. When you use corner mullions between two
segments of curtain wall, they will automatically adjust to the angle between the segments, as
shown in Figure 12.46.
Figure 12.46
Corner mullions
adapt to angles
between curtain
wall segments.
Before you place a corner mullion, make sure the endpoints of the two curtain wall segments
are cleanly connected. You can drag the endpoint controls of the walls or use the Trim/Extend
To Corner tool. To place a corner mullion, simply use the Mullion tool and select one of the
corner edges of either one of the wall segments. If you have already placed a regular mullion at
the end of a curtain wall segment, select the mullions along the vertical edge, and then use the
Type Selector to choose a corner mullion type. Remember that you can use the context menu
(right-click and select Mullions ➢ On Gridline) to make the selection easy.
Customizing Curtain Wall Types
In the previous exercises, you learned the fundamental techniques of building a simple but
custom curtain wall design. To reap some additional productivity from the curtain wall tool,
you can predefine almost all the properties necessary to generate a complete curtain wall
assembly simply by placing the wall in your project. In the following sections, we will examine
one of the curtain wall types included with the default project template.
Download and open the file c12-Simple-Curtain-Wall.rvt or c12-Simple-Curtain-
Wall-Metric.rvt from this book’s web page at www.sybex.com/go/masteringrevit2015.
Switch to a 3D view, and you will see that the wall already has vertical and horizontal divisions
along with mullions placed on the divisions, as shown in Figure 12.47.
c12.indd 511 5/3/2014 11:13:12 AM