Page 23 - Mold Bases & Plates 2020
P. 23
DME XPress PLUS Mold Bases
                                                                                                                     23
                                    DME XPress PLUS Mold Bases


                     Get XPress 3D CAD data:  Go to: www.dme.net/xpresscad
                     3D CAD data available in SolidWorks  Parametric, Creo Parametric and Parasolid.
                                                  ®
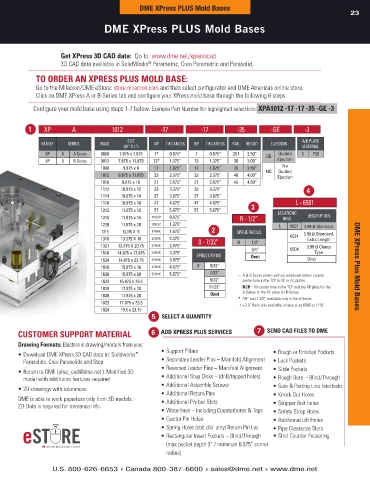
             TO ORDER AN XPRESS PLUS MOLD BASE:
             Go to the Milacron/DME eStore: store.milacron.com and then select configurator and DME Americas online store.
             Click on DME XPress A or B-Series tab and configure your XPress mold base through the following 6 steps:
            Configure your mold base using steps 1-7 below. Example Part Number for highlighted selections: XPA1012 -17 -17 -35 -GE -3


          1     XP       A            1012            -17          -17          -35        -GE        -3
                                           SIZE                                                      A/B PLATE
               FAMILY  SERIES     BASE              AP  THICKNESS  BP  THICKNESS  RAIL  HEIGHT  EJECTION
                                          (W” X L”)                                                  MATERIAL
                XP   A   A Series  0808  7.875 x 7.875  7*  0.875”  7  0.875”  25†  2.50”  GE  Guided   3  P20
                XP   B   B Series  0812  7.875 x 11.875  13*  1.375”  13  1.375”  30  3.00”  Ejection
                                                                                              No
                                  1008    9.875 x 8  17  1.875”  17   1.875”  35   3.50”  NG  Guided
                                  1012  9.875 x 11.875  23  2.375”  23  2.375”  40  4.00”    Ejection
                                  1016   9.875 x 16  27  2.875”  27   2.875”  45   4.50”
                                  1112   10.875 x 12  33  3.375”  33  3.375”                          4
                                  1114   10.875 x 14  37  3.875”  37  3.875”
                                  1118   10.875 x 18  47  4.875”  47  4.875”                       L - 6501
                                  1212   11.875 x 12  57  5.875”  57  5.875”        3        LOCATIONG
                                  1215   11.875 x 15  7NCH*  0.875”             R - 1/2”       RING    DESCRIPTION
                                  1220   11.875 x 20  13NCH*  1.375”                         L   6501  3.99 ø Standard
                                   1315  13.375 X 15  17NHC  1.875”    2       SPRUE RADIUS           3.99 ø Standard,
                                  1318   13.375 X 18  23NHC  2.375”  0 - 7/32”  R   1/2”         6521  Extra Length
                                  1321  13.375 X 20.75  27NHC  2.875”                            6504  3.99 ø Clamp
                                  1518  14.875 x 17.875  33NHC  3.375”  SPRUE ORIFICE  3/4”              Type
                                  1524  14.875 x 23.75  37NHC  3.875”               Omit               Omit
                                  1616   15.875 x 16  47NHC  4.875”  0  5/32”                                         DME XPress Plus Mold Bases
                                  1620   15.875 x 20  57NHC  5.875”     7/32”   –  A & B-Series plates with no additional letters include
                                  1623   15.875 x 23.5                9/32”      center hole in the TCP & AP, or AC plates.
                                  1818   17.875 x 18                  11/32”    –  NCH = No center hole in the TCP and the AP plate for the
                                                                                 A-Series or the AC plate for B-Series
                                  1820   17.875 x 20                   Omit     *  7/8” and 1 3/8” available only in the A-Series
                                  1823   17.875 x 23.5                           † = 2.5” Rails only available in base sizes 0808 to 1118
                                  1924   19.5 x 23.75
                                                    5  SELECT A QUANTITY


       CUSTOMER SUPPORT MATERIAL                   6  ADD XPRESS PLUS SERVICES         7  SEND CAD FILES TO DME
       Drawing Formats: Electronic drawing/models from you:
                                                      •  Support Pillars                   •  Rough or Finished Pockets
       •  Download DME XPress 3D CAD data in: Solidworks ™
         Parasolids, Creo Parasolids and Step         •  Secondary Leader Pins – Manifold Alignment  •  Lock Pockets
                                                      •  Reversed Leader Pins – Manifold Alignment   •  Slide Pockets
       •  Return to DME (dme_cad@dme.net ): Modified 3D
         model with additional features required      •  Additional Stop Disks – (drill/tapped holes)  •  Rough Bore – Blind/Through
                                                      •  Additional Assembly Screws        •  Side & Parting Line Interlocks
       •  2D-drawings with tolerances
                                                      •  Additional Return Pins            •  Knock Out Holes
       DME is able to work paperless only from 3D-models,   •  Additional Pry bar Slots    •  Stripper Bolt holes
       2D-Data is required for tolerance info.
                                                      •  Waterlines – including Counterbores & Taps  •  Safety Strap Holes
                                                      •  Ejector Pin Holes                 •  Additional Lift Holes
                                                      •  Spring Holes (std. dia. only) Return Pin Loc.  •  Pipe Clearance Slots
                                                      •  Rectangular Insert Pockets – Blind/Through      •  Shot Counter Pocketing
                                                        (max pocket depth 3” / minimum 0.375” corner
                                                        radius)

                  U.S. 800-626-6653  ■  Canada 800-387-6600  ■ sales@dme.net  ■ www.dme.net

