
Page 126 - Lydia Chen - The Complete Book of Chinese Knotting
P. 126
07 Creative Designs (115-129) 3/26/07 2:28 PM Page 123
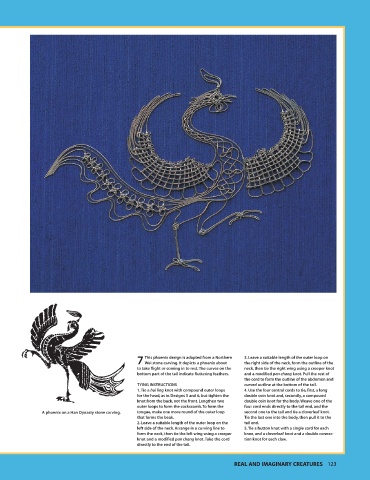
This phoenix design is adapted from a Northern 3. Leave a suitable length of the outer loop on
7 Wei stone carving. It depicts a phoenix about the right side of the neck, form the outline of the
to take flight or coming in to rest.The curves on the neck, then tie the right wing using a creeper knot
bottom part of the tail indicate fluttering feathers. and a modified pan chang knot. Pull the rest of
the cord to form the outline of the abdomen and
TYING INSTRUCTIONS curved outline at the bottom of the tail.
1.Tie a hui ling knot with compound outer loops 4. Use the four central cords to tie, first, a long
for the head, as in Designs 5 and 6, but tighten the double coin knot and, secondly, a compound
knot from the back, not the front. Lengthen two double coin knot for the body.Weave one of the
outer loops to form the cockscomb.To form the four cord ends directly to the tail end, and the
A phoenix on a Han Dynasty stone carving. tongue, make one more round of the outer loop second one to the tail and tie a cloverleaf knot.
that forms the beak. Tie the last one into the body, then pull it to the
2. Leave a suitable length of the outer loop on the tail end.
left side of the neck. Arrange in a curving line to 5.Tie a button knot with a single cord for each
form the neck, then tie the left wing using a creeper knee, and a cloverleaf knot and a double connec-
knot and a modified pan chang knot.Take the cord tion knot for each claw.
directly to the end of the tail.
REAL AND IMAGINARY CREATURES 123