
Page 37 - The Ashley Book of Knots
P. 37
THE ASHLEY BOOK OF KNOTS
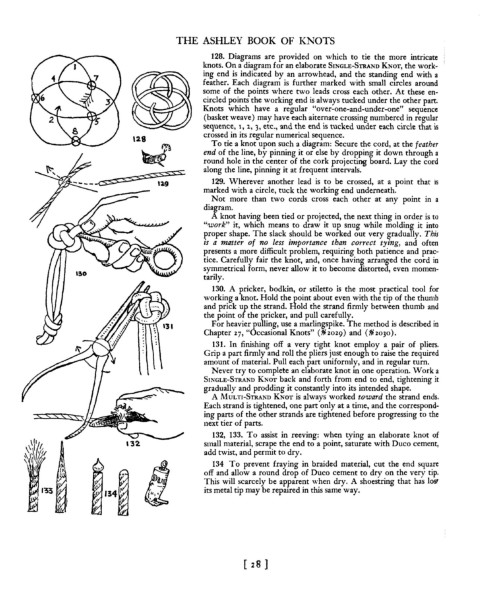
128. Diagrams are provided on which to tie the more intricate
knots. On a diagram for an elaborate SINGLE-STRAND KNOT, the work-
ing end is indicated by an arrowhead, and the standing end with a
feather. Each diagram is further marked with small circles around
some of the points where two leads cross each other. At these en-
circled points the working end is always tucked under the other part.
Knots which have a regular "over-one-and-under-one" sequence
2 r---- (basket weave) may have each aiternate crossing numbered in regular
sequence, I, 1, 3, etc., and the end is tucked under each cirde that is
crossed in its regular numerical sequence.
'2.8
To tie a knot upon such a diagram: Secure the cord, at the feather
end of the line, by pinning it or else by dropping it down through a
round hole in the center of the cork projecting board. Lay the cord
along the line, pinning it at frequent mtervals.
12.9 129. Wherever another lead is to be crossed, at a point that IS
marked with a circle, tuck the working end underneath.
Not more than two cords cross each other at any point in a
diagram.
A knot having been tied or projected, the next thing in order is to
"work" it, which means to draw it up snug while molding it into
proper shape. The slack should be worked out very gradually. This
is a mlftter of no less importance than correct tying, and often
presents a more difficult problem, requiring both patience and prac-
tice. Carefully fair the knot, and, once having arranged the cord in
symmetrical form, never allow it to become distorted, even momen-
,~o
tarily.
130. A pricker, bodkin, or stiletto is the most practical tool for
working a knot. Hold the point about even with the tip of the thumb
and prick u the strand. Hold the strand firmly between thumb and
the point 0 the ricker, and pull carefully.
For heavier pu ling, use a marlingspike. The method is described in
• '31
• •
• • Chapter Z7, "Occasional Knots" (jljlzoZ9) and (jljlz030).
•
•
• •
•
•
• • 131. In finishing off a very tight knot employ a pair of pliers.
•
•
•
• Grip a part firmly and roll the pliers just enough to raise the required
amount of material. Pull each part uniformly, and in regular turn.
Never try to complete an elaborate knot in one operation. Work a
SINGLE-STRAND KNOT back and forth from end to end, tightening it
gradually and prodding it constantly into its intended shape.
A MULTI-STRAND KNOT is always worked toward the strand ends.
Each strand is tightened, one part only at a time, and the correspond-
ing parts of the other strands are tightened before progressing to the
next tier of parts.
132, 133. To assist in reeving: when tying an elaborate knot of
132. small material, scrape the end to a point, saturate with Duco cement,
add twist, and permit to dry.
134 To prevent fraying in braided material, cut the end square
off and allow a round drop of Duco cement to dry on the very tip.
This will scarcely be apparent v,·hen dry. A shoestring that has lOST
its metal tip may be repaired in this same way.