
Page 143 - Photoshop for Lightroom Users – Scott Kelby 2nd Edition
P. 143
blends the background and adds contrast. (2) Soft Light does the same thing, but it doesn’t add as much contrast, so the effect looks more subtle. And, (3) I
choose Multiply if the background looks too light after I’ve tried Overlay or Soft Light (I usually try them in that order). Here, I chose Overlay. It does a
great job of adding the texture, but of course, it also puts it right on top of your subject, so it looks like she has a really bad case of psoriasis.
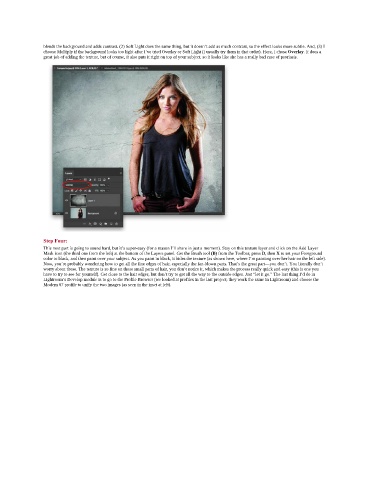
Step Four:
This next part is going to sound hard, but it’s super-easy (for a reason I’ll share in just a moment). Stay on this texture layer and click on the Add Layer
Mask icon (the third one from the left) at the bottom of the Layers panel. Get the Brush tool (B) from the Toolbar, press D, then X to set your Foreground
color to black, and then paint over your subject. As you paint in black, it hides the texture (as shown here, where I’m painting over her hair on the left side).
Now, you’re probably wondering how to get all the fine edges of hair, especially the fan-blown parts. That’s the great part—you don’t. You literally don’t
worry about those. The texture is so fine on those small parts of hair, you don’t notice it, which makes the process really quick and easy (this is one you
have to try to see for yourself). Get close to the hair edges, but don’t try to get all the way to the outside edges. Just “let it go.” The last thing I’d do in
Lightroom’s Develop module is to go to the Profile Browser (we looked at profiles in the last project; they work the same in Lightroom) and choose the
Modern 07 profile to unify the two images (as seen in the inset at left).