
Page 47 - DP1_Spring2019
P. 47
colors into it in layers. A little of one color then another and so on. Repeat until all of the paint is in one cup. Do not stir. Put gloves on if desired; it gets messy at this point! Hold the cup in one hand and turn the surface over and lay on top of the cup. Hold the cup tight against the surface and turn right side up and set back onto the scrap wood. Let the contents settle before lifting the cup and then slowly lift the cup to
let the paint spread onto the surface. Set the empty cup aside. Pick up the Lazy Susan and gently move it around to let the paint flow across the surface. Turn as desired to make swirls and streaks. When you are happy with how it looks, set it back onto the scrap wood and let the sides drip onto the paper. Take a sponge brush and wipe off the sides and along the bottom to remove the remaining drips. You may need
to do this several times. Let dry completely. It will take two or three days, depending on how thick the paint is on your surface. When dry, transfer the outlines only of the design for the koi fish, lily pads and lotus flower.
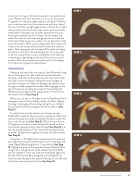
ORANGE KOI
Basecoat the body with two coats of Light Buttermilk using the no. 16 bright brush. We will do the fins and tail after
the body. Load the no. 8 round brush with True Ochre. Dab this color onto the body by holding the brush straight up and down and pounce. Allow the background color to show through to make it appear like scales. Add a highlight on the top of the koi by repeating this step with Snow (Titanium) White and pouncing the color along center of the fish from the head to the tail (see Step 1).
When dry, use the no. 16 bright brush to float Burnt Sienna along each side of the koi. Mop to soften the float. Repeat this step to strengthen the shading. Using the no. 4 bright brush, float Burnt Sienna along his mouth to define it (see Step 2).
STEP 2
STEP 1
To add the fins and tail, add a touch of water to Light Buttermilk to make an inky consistency. Using the rake brush, start at the body and stroke out toward the tip to create the lines in the fins and tail (see Step 2). When dry, use the no. 10 bright brush to float a wash of Light Buttermilk onto the fins and tail, leaving the lines show through (see Step 3). Let this dry and add a wash of True Ochre here and there. Mop to soften. Shade the fins against the body with Burnt Sienna (see Step 4).
Using the no. 10 bright brush, shade around the eyes and the area above his eye with Burnt Sienna. Fill in the eyes with Lamp (Ebony) Black using the no. 2 round brush (see Step
3). Highlight the top of the eyes with Snow (Titanium) White using the no. 4 bright brush. Add a Snow (Titanium) White dot for a sparkle in each eye. Add some reflected light onto the fish with Country Blue. Using the no. 10 bright brush, float this color along the left side of the body, on the left side of the fins and on the top of the tail (see Step 4).
STEP 4
STEP 3
DECORATIVEPAINTERS.ORG 45
