
Page 56 - The Decorative Painter Spring 2015
P. 56
OIL
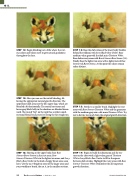
STEP 12: Begin blending just a little where the vari- ous colors and values meet to give natural gradations throughout the face.
STEP 14: Here you can see the initial blending, fol- lowing the appropriate natural growth direction. The uppermost dark areas are the kit’s upper legs, which are blended a bit horizontally. The central rust areas and lower gray/black belly in the shadows are blended down- ward. The round “hip” on the right has a rather nondi- rectional blend, because you’re seeing the fur straight on.
STEP 16: Moving to the upper body, base Raw Sienna+Burnt Sienna in the rust areas, Raw Sienna+Titanium White in the lighter tan areas, and Ivory Black+Raw Umber in the dark, choppy breast areas seen here. Use the no. 6 bright in some of the larger areas and your workhorse brush, the no. 4, in the smaller sections.
STEP 13: Base the dark values of the lower body (hidden behind the trillium) with Ivory Black+Raw Umber. Base medium-value gray with the dark mix+Titanium White. Base darker rusty areas with Burnt Sienna+Raw Sienna (1:1). Finally, base the lighter tan areas with a lighter mix of Raw Sienna+tch Burnt Sienna. At this point the colors remain rather distinct.
STEP 15: Switch to a smaller brush. Highlight the rust areas with Raw Sienna+Titanium White and the gray areas with the medium gray mix+a bit more Titanium White. Try not to deviate too much from the original growth direction.
STEP 17: Begin to build the dimension and fur tex- ture on the chest with a light-value gray of Titanium White+Ivory Black+Raw Umber to fill in the spaces between dark strokes. Highlight the rusty areas with Raw Sienna+Titanium White. Remember the all-important growth direction.
54 The Decorative Painter • ISSUE NO. 1, 2015
DECORATIVEPAINTERS.ORG
