
Page 54 - The Decorative Painter Spring 2015
P. 54
OIL
PAINTING TIPS
n Cobaltsiccative,adryingagent,maybeaddedinfractions of a drop to each patty of oil paint on your palette to speed drying time. To use, dip a palette knife into drier, bleed off excess against the side of the bottle, then touch the knife tip next to each patty of paint. (If too much comes off knife, do not mix the entire amount into the paint.) Mix drier into the paint using a clean palette knife. Drying time is six hours to overnight, depending on the pigment and relative humidity.
n Color should be loaded onto the brights from a loading zone, a strip of sparse paint pulled from a patty of paint down on the palette. Mixtures are made by moving from one loading zone to another, working back and forth, to achieve a mix of two or more colors.
n Wipethebrushonapapertowelafterapplyingpainttothe surface, but before beginning to blend. Blend colors only where they meet using a dry brush and short strokes.
n Use the smaller brush sizes (nos. 0, 2, and 4) for smaller areas, working with the largest size comfortable to achieve the detail necessary. The no. 6 is appropriate for the basecoat of larger areas such as the leaves. I always keep my no. 8 bright handy; while I don’t often paint with that size, I use it dampened with odorless thinner for cleanup. Use the brush size listed in the instructions, and stick with that size until the instructions say to change.
TIPS FOR PAINTING FUR
n Fur (and hair) has a natural growth direction. When lay- ing in color, use the chisel edge of the bright or round brush, pulling in the proper growth direction for the fur to appear realistic. For the body, make many overlap- ping strokes, following the appropriate growth direction, beginning on the outer edges of the animal and overlap- ping hairs as you move inward and upward toward the head. When you work on the head, continue to follow the growth direction of the individual areas.
n Any area of fur, regardless of size, will contain different values and colors within that area. Using different values in a range from dark to light will help create a more realis- tic look. A patch of black fur, for example, will have areas of brown or tan or sienna within it. Additional values are added with shading and highlighting for depth and con- trast.
n Choose smaller sizes of brights to better indicate the re- alistic look of shorter fur (e.g., fur found on the head and face) and use larger brights for longer fur (e.g., fur found on the chest, belly, and tail).
n Use colors sparsely, picked up from a dry loading zone on your palette. And be patient! It takes many individual brushstrokes to yield the final effect of realistic animal fur.
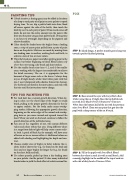
FOX
STEP 3: Inked design. A perfect transfer goes a long way toward a perfect finished painting.
STEP 4: Base around the eyes with Ivory Black+Raw Umber using the no. 2 bright. Base the top half of each iris with Ivory Black+French Ultramarine+Titanium White. Base the bottom half of the iris with the previous mix+Ivory Black. Clean out any paint that gets into the pupil with a damp corner of the no. 8 brush.
STEP 5: Fill in the pupils with Ivory Black. Blend between the values in each iris with a small brush. Add a smudgy highlight in the middle of the top of each iris with a bit of dirty brush+Titanium White.
52 The Decorative Painter • ISSUE NO. 1, 2015
DECORATIVEPAINTERS.ORG
