
Page 23 - The Decorative Painter Summer 2015
P. 23
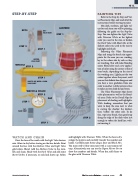
   STEP-BY-STEP
 KEYS
STEP 2
WHISTLE STEP 2
STEP 1
WHISTLE AND WATCH & CHAIN - VALUE CHART
WATCH & CHAIN STEP 2
LANTERN STEP 1
STEP 1
CAP - VALUE CHART
CAP
STEP 1
LANTERN - VALUE CHART
KEYS -
VALUE CHART
STEP 1
WATCH AND CHAIN
Paint the face of the watch with the Light Value lantern mix. Allow to dry before tracing on the face details. Paint around the face with the Medium Value and Light Value gold colors. Blend. Add the Medium Value to the stem, fob, and chain. Shade with the Dark Value and add some Burnt Umber, if necessary, so each link shows up. Soften
STEP 2
and highlight with Titanium White. When the face is dry, realign the pattern and carefully transfer the number and hands. Carefully paint them using a liner and Black Mix. You may need to thin your paint with a scant amount of turp. Alternatively, you can use the Pigma Micron Pen to draw the numbers and details. When dry, add shines to the glass with Titanium White.
DECORATIVEPAINTERS.ORG
The Decorative Painter • ISSUE NO. 2, 2015 21
STEP 2
 O I L
    PAINTING TIPS
Refer to the Step-by-Step and Val- ue Placement Map, and read all of the instructions before starting to paint.
Mix dark, medium, and light val- ues for each item you will be painting, following the guide on the Step-by- Step. You can lighten the Light Value with Titanium White or the lightest color you used in the mix, or darken the Dark Value with Black Mix or the darkest color you used in the mix to highlight and shade.
Following the Value Placement Map and using the brush size appro- priate for the area you are working, lay in the colors side by side so they are touching. This will make blending easier. Blend after each new applica- tion of color using the corner or flat of your brush, depending on the size of the working area. Lightly pat the two colors together where they meet, until you see that definite line disappear and you have a nice gradation from one color to another. A little texture is fine; it makes an item look old and worn.
The Value Placement Map shows color placement as well as the blend- ed areas. Refer to the Detail Map for placement of shading and highlights. With shading, remember that you want to keep the area next to what is casting the shadow the darkest, then “soften” the other side. To do this, wipe your brush, then gently tap along the edge of the dark value just enough to soften the hard line, with- out moving it.
