
Page 24 - The Decorative Painter Summer 2015
P. 24
OIL
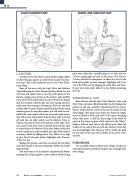
VALUE PLACEMENT MAP SHADES AND HIGHLIGHT MAP
LANTERN
In order for the wire that’s in back of the red glass globe to show through, paint it in solid with the Light Value lan- tern mix (This is the darkened area on the Value Place- ment Map).
Base all the areas with the Light Value and Medium Value following the Value Placement Map. Blend. For the wire bail and raised areas in the top and bottom of the lantern, realign your pattern to the lantern, and carefully trace on the wire and raised areas; this will etch the design into the wet paint. Shortly after you start tracing, check to make sure your tracing is showing up (If it’s not, you may need to allow it to dry before transferring the details using transfer paper. If using this option, you will need to rees- tablish the same colors within the wire and raised areas). You will use one value darker than the base color to round off each area. In other words, use the Medium Value to darken each side of a wire or raised area in the Light Value area, and use the Dark Value to darken each side of a wire or raised area in the Medium Value area. Soften, within the wire or raised area, and reestablish any Light Value areas if necessary. Shade by adding more Ivory Black to an edge of your Dark Value mix. Soften. Highlight with Titanium White. Let dry.
Realign the pattern, and trace on details for the holes and other details at the top and bottom. Follow the Detail Map to finish.
You may want to let the lantern completely dry before painting the red glass globe, as you want to avoid having
pink wire; otherwise, carefully paint it in with Alizarin Crimson going right up next to the wires. The Alizarin Crimson should be transparent to allow the wire in the back of the globe to show through. Highlight with Cad- mium Red Deep just by tapping on a little here and there. If your wire turns pink, allow it to dry before repainting the wire.
ENGINEER’S CAP
Base all areas with the Light Value, Medium Value, and Dark Value cap mixes. Blend and allow to dry. Realign the pattern to the cap, carefully transferring all the stripes. Paint a stripe near the center of the cap (as shown on the Detail Map), then paint every other one. Paint the stripes with the Medium Value and Dark Value mixes, blending where they meet. I used the chisel edge of my brush to paint in the stripes to give a little texture to the “fabric.” Shade a little on each side of the ribbed areas. Paint the eyelets on the side of the cap with the Medium Value key mix and highlight with Titanium White. Detail the label on the front of the cap with scribbles of the Dark Value cap mix.
FINISHING
Use a suitable frame to finish your collage. I hope you enjoyed this project and that it inspires you to design your own collage.
22 The Decorative Painter • ISSUE NO. 2, 2015
DECORATIVEPAINTERS.ORG
