
Page 22 - The Decorative Painter Winter 2017
P. 22
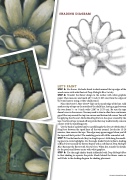
 SHADING DIAGRAM
   20
DECORATIVEPAINTERS.ORG
LET’S PAINT
STEP 5: Use the no. 18 shader brush to shade around the top edges of the wood canvas with wide floats of Deep Midnight Blue. Let dry.
STEP 6: Transfer the flower design to the surface with white graphite paper. Then measure and mark off 3⁄4 inch (1.905 cm) from the edges of the wood canvas using a white chalk pencil.
Place the Painter’s Mate Green® Tape on the inside edge of the line. Add another strip of tape on the outside of the chalk line, leaving a gap between the two about 1⁄16- to 1⁄8-inch wide (.1587 to .3175 cm). Be sure the tape doesn’t cross in the corners. You may need to trim to allow for a continuous gap all the way around the top two corners and bottom left corner. You will be applying the DecoArt Media Modeling Paste in the space created by the tape. Use bits of tape to mask off any petals that may inadvertently come in contact with the modeling paste.
Use the back of a palette knife to carefully apply the DecoArt Media Mod- eling Paste between the taped lines all the way around. Let dry for 15-20 minutes, then remove the tape. The edges may appear ragged when you lift the tape and that’s perfect! The modeling paste will still be somewhat soft. STEP 7: Use the liner brush (dry) to drag Emperor’s Gold along the model- ing paste to create highlights. Use the angle shader brush to float a shading of Black Green around the flower. Repeat with a soft float of Deep Midnight Blue. Basecoat the flower with Neutral Grey. When dry, transfer the details for the petals and flower center with white graphite.
STEP 8: Use the angle shader brush sideloaded with Deep Midnight Blue to float shading to separate the petals. Shade behind the flower center as well. Refer to the shading diagram for shading placement.
