
Page 34 - The Decorative Painter Fall 2017
P. 34
STEP-BY-STEP
BACKGROUND AND TREE
LET’S PAINT BACKGROUND
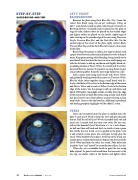
Basecoat the plate using Dark Blue Mix. Dry. Create the varied faux finish using wet-on-wet technique. Using an old 1" wash brush, brush the plate with DecoArt Extender & Blending Medium. Generally, paint is placed on the plate in rings of color; darker colors are placed on the outside edges and lighter colors are placed on the inside. Apply rings of color starting on the outside edge of the rim using Dioxazine Purple, Prussian Blue Hue, and the Dark Blue Mix. On the outside edge of the center of the plate, apply Carbon Black, Prussian Blue Hue, and the Dark Blue Mix nearer to the center of the plate.
Brush-blend the paints to soften; dry-wipe the brush with a paper towel between colors and add more Extender to keep it moist. Keep paint moving while blending, being careful not to over-blend. Final touch on the rim is to use a small sponge wet with the Extender to dab up and down and slightly blend col- ors adding touches of Warm White, True Gold, and True Silver here and there for interest. If required, use mop brush to give a final softening affect. Keep the outer edge darkest in color.
Add a moon circle using wash brush with Warm White, and gradually working toward the center use Titanium White. Blot the white colors together using a small brush with Ex- tender. Add dabs of Vermilion to the bottom edge of the moon and Hansa Yellow and a touch of Yellow Oxide to the bottom edge of the moon. Use the sponge to dab up and down and blend. Pull lighter moonlight streaks of white from the edge of the moon into the dark blue areas using a clean wash brush that has Extender in it. Final softness is achieved using a clean mop brush. Later, in the final touches, additional moonbeam and hurling pumpkin highlights will be added. Let dry.
TREES
Trees can be painted onto the plate or molded onto the plate. I used Quick-Wood to form the trees and give the plate texture. Half the roll of Quick-Wood is kneaded until soft and inner core is mixed with the outer core color. For one tree, roll out the kneaded Quick-Wood into a 1⁄2- to 1-inch diame- ter ball and then roll back and forth to stretch it into a piece that will be the tree trunk. As it is applied to the plate, twist it and scrunch it into place. Use craft glue to help glue the Quick-Wood molded-tree in place. At the top of the trunk, use smaller pieces to form the branches. Repeat with the rest of the Quick-Wood and form the other tree trunk. Poke holes into trunk for “eyes” and “mouth” to create illusion of faces. Let dry.
When dry, use a scrumbler brush to paint the tree using dabs of paint. As paint is advanced from the tree roots to the tree top, use darker colors at the bottom and lighter colors
32 The Decorative Painter
• FALL 2017
DECORATIVEPAINTERS.ORG
