
Page 40 - The Decorative Painter Spring 2014
P. 40
oil
PREPARATION
TiPs FoR ACRYLiC BAsECoATs: With water, fill new bottles of paint to the bottom of neck. Replace the lid and shake well. This will reconstitute paint to original consistency. For partially used bottles, add enough water to bring the paint to the same consistency.
Seal the ice bucket’s lid, front and back, with The Magic Brush Wood Sealer and allow it to dry. When it is dry sand it well, and then remove any sanding debris. BAsECoATinG: Base the painting surface with Moss Green using a sponge roller. Allow this to dry completely and then sand smooth, removing any sanding debris. Now apply a coat of Moss Green mixed with a small amount of retarder to slow drying time. While the surface is wet, drizzle a 2" (5.1cm) stripe of Seminole Green a couple of inches from edge of surface. Use a clean roller to blend this softly into the background color. Deepen within the Semi- nole Green by blending in a touch of Gamal Green. Soften this with the same roller. To create balance, use the roller to move some of the greens to other areas of the surface.
Next, drizzle a 1" (2.5cm) puddle of Copen Blue+Purple (4:1) in an open area. Blend this into the surface using a clean roller. Move some of this color mix to other ar- eas of the surface, this time avoiding the green areas that were previously created. Finally, with the roller used for the original basecoat, apply Eggshell White highlights to lighten as needed. Allow this to dry completely and then sand it smooth, removing any dust. Spray the entire sur- face with Krylon Matte Finish, and allow it to dry. TRAnsFER THE DEsiGn: Using the inked design (not a col- or placement sheet) transfer the design to the surface. Use
PAINTING TIPS
usinG A DRiER: To speed the paint’s drying time, cobalt siccative (a drying agent) may be added in fractions of a drop to each patty of oil paint on the palette. I use this every time I paint.
Dip the palette knife (preferably a painting knife with a straight blade) into the drier (cobalt siccative). Bleed off excess against the side of the bottle, and then touch the tip of the knife next to (not directly on) each patty of paint, leaving just a freckle of drier. If too much drier comes off the knife, do not mix the entire amount into the paint. Mix each tiny freckle into the paint patty using a clean palette knife. If the paint does not remain workable on the palette for at least eight hours, too much drier has been added. Drying time ranges from six hours to overnight, depending on the particular pigment and relative humidity.
unDERsTAnDinG THE sTEP-BY-sTEP PHoTos: Use the photos of the painted Step-by-Steps as a guide as you follow the written instructions. Read the written in-
light graphite on dark backgrounds and dark graphite on light backgrounds. Lay graphite paper over the prepared painting surface. Place the inked design on top of the graphite. Lay a piece of tracing paper on top of the design to protect the original during transfer. Tape the stack into position so that it will not slide as you work. Transfer the design details completely and carefully. Include all detail lines on the feathers, and the correct flower shapes, mak- ing the transfer as accurate as possible. After beginning, check the design to ensure that it is applying clearly. If the application is too faint, use a new piece of graphite.
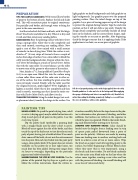
Full shot of prepared painting surface with design applied. Note the softly blended gradations of value and color in the background. When applying the sponge-rolled background strive to accomplish this soft, blended look, rather than ending the blending prematurely. Ending too soon will leave the colors in hard lines, with no value gradation.
structions carefully. Refer to the steps shown in the pho- tos to determine color placement, blending, and other additions. Instructions are written in the sequence in which the piece was painted. Work in that order, finish- ing each element before moving on to the next. LoADinG AnD BLEnDinG BAsiCs: Color should be loaded onto the brights from a loading zone (a strip of sparse paint pulled downward from a patty of paint on the palette). Mixtures are made by moving from one loading zone to another, working back and forth to achieve a mix of two or more colors. Wipe the brush on a paper towel after applying paint to the surface, but before beginning to blend. Blend colors where they meet (this is very important!), using a dry brush and short strokes. Do not blend randomly over the entire area; blend only on the line where the colors come together, creating a new value and hue with the process of blending. An overall blending will cause loss of values and clarity.
38
The Decorative Painter • ISSUE NO. 1, 2014
decorativepainters.org
