
Page 89 - DPM3_Fall_2021_Flipbook
P. 89
FLOWERS
DOTTING
DOTTING
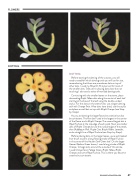
Before starting the dotting of the cutouts, you will need to establish which dotting tools you will use for size, remembering that there are sometimes dots on top of other dots. I used my Royal D-15 stylus tool for most of the smaller dots. Take care in placing dots close but not touching. I also used a series of mandala dotting tools.
Continuing with the smaller leaves on the stems, place descending Bright Yellow dots along the center of each leaf starting at the base of the leaf using the double-ended stylus. For the dots on the stems here, use a larger dotting tool with Orange Twist. After dots have dried, use the stylus and place a small dot on top with Bright Orange (see Step- by-Steps).
As you are dotting the large flower, be creative but also
be consistent. The first dot I used is the largest in the center of the flower and is Bright Orange. The second largest dot is Royal Fuchsia at the top edge of each petal. Next are smaller dots of Bright Orange around the outside edge of the petals, then Bubblegum Pink, Purple Cow, Bright Yellow, Lavender, and a straight line of Royal Fuchsia (see Step-by-Steps).
Before placing dots on the larger leaves, use a well-loaded liner brush to paint a long flowing stroke of Royal Fuchsia
in the center of the Hauser Dark Green leaf. On the larger Hauser Medium Green leaves, I used a long stroke of Bright Orange. To begin dots around the outside of this stroke,
I used Orange Twist, Foliage Green, Bright Yellow, Bright Orange, and some Royal Fuchsia. This is where you become creative but consistent.
DECORATIVEPAINTERS.ORG 87
