
Page 54 - The Decorative Painter Spring 2016
P. 54
ACRYLIC
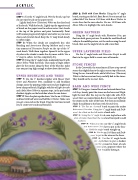
SKY
STEP 1: Use the 3⁄4" angle brush. Wet the brush, tap, but do not wipe brush on the paper towel.
Lightly load Snow (Titanium) White on the chisel end of the brush. Walk the brush. Lightly tap the opposite end of brush on the paper towel to reduce water. Start clouds at the top of the pattern and paint horizontally. Paint will become progressively lighter and softer as you move down each level of cloud. Keep the 1⁄2" mop brush handy to soften edges.
STEP 2: When the clouds are completely dry, take blending and Americana Glazing Medium and a very tiny amount of Dioxazine Purple on the tip of the 1⁄4" wash brush. Walk them together. Spread it in the upper sky above the clouds to make the sky more subtle. Use a 3⁄4" mop to soften. Let this completely dry.
STEP 3: Using the 3⁄4" angle brush, moderately load it with Moon Yellow. Walk the brush. Then make a bright yellow glow for the sunrise along the base of the blue sky; make sure you put it up high enough to show above the tree line.
UPPER BRUSHLINE AND TREES
STEP 1: Use the 3⁄8" deerfoot stippler with Hauser Dark Green and Plantation Pine, randomly to add brushline clumps across the painting. Make sure you have higher and lower clumps of brush. Highlight with bits of Light Avocado and a little Moon Yellow in separate steps, in the pre-loaded deerfoot stippler, on the brushline where the sun shines. STEP 2: Turn the plate upside down. Use the no. 10/0 liner and load with half water and half Burnt Umber. Make sure you get a nice end on the brush. Drag the tree lines toward
STEP 3: Field with Corn Shocks: Using the 1⁄4" angle brush, starting on the left, float Burnt Sienna around the yellow field. Use the no. 10/0 liner with Burnt Umber to create lines for the corn shocks. Use no. 10/0 liner with Moon Yellow to highlight the corn shocks.
GREEN PASTURES
Using the 1⁄4" angle brush with Plantation Pine, put floats on both green pastures. To make the small knoll and valley in the middle pasture, wet the surface using the oval brush, then use the angle brush to add a nice float.
UPPER LAVENDER FIELD
Use the 1⁄4" angle brush and Dioxazine Purple to add floats to the upper field to create rows of lavender.
STONE FENCES
In the Cotswolds, the stone fences all have a top row of stones that slightly lean to the right, one on top of the next. Using the no. 4 round brush, add a little Snow (Titanium) White to the basecoat and very carefully dab in the stones. They should not be in exact form.
BARN AND WIRE FENCE
STEP 1: Using no. 4 round brush and watered down Neu- tral Grey, loosely paint the stones on the barn roof. High- light the roof after this step on the right side with Drift- wood. Next use watered down Burnt Sienna and Toffee for the stones on the sides of the barn. Put them in randomly. Shade the addition to the barn with Neutral Grey.
STEP 2: Use the no. 4 round brush to paint the arches Bittersweet Chocolate. Using the 1⁄4" angle brush and Drift- wood, do a flfloat on the leftft inside of each arch.
STEP 3: Using the 3⁄4" angle brush, mix Asphaltum with
a lot of water, then flfloat the road and barnyard to add shadows.
STEP 4: When it is dry, use the 1⁄4" angle brush and Bittersweet Chocolate to put in the fenc-
es. Hold the angle brush straight up. STEP 5: Use the no. 10/0 liner and Drift-
y
y
.
o
o
u
t
u
t
o
c
o
c
r
r
e
e
a
a
t
t
e
t
e
t
r
r
e
e
e
t
e
t
r
r
u
u
n
n
k
k
s
a
s
a
n
n
d
b
d
b
r
r
a
a
n
n
c
c
h
h
e
e
s
s
.
wo
w
d t
w
d
oo
od
n the wire on the fence. STEP 6: Use the 1⁄4" angle brush and Asphaltum to put a shadow on the ground in front of each fence post, opposite where the
sun would be hitting it.
to
o p
pu
ut
t i
in
52
The Decorative Painter
• ISSUE NO. 1, 2016
DECORATIVEPAINTERS.ORG
