
Page 51 - The Decorative Painter - Fall 2019
P. 51
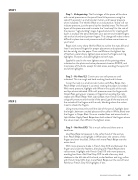
STEP 1
  STEP 2
Step 1 – Underpainting: The first stages of the piece will be done with varied pressures on the pencil from little pressure using the side of the pencil in a small circular motion, and heavier pressure when indicated. The Verithin Black or as indicated as “sharp” will not indicate pressure, just the pencil tip for detailed areas. The first soft layers of the piece are used to create the “road map” for the rest of the piece or “ugly duckling” stage. A good solution for creating soft layers is to place the pencil between your pointer and middle fingers rather than thumb and pointer fingers. This change will make it more difficult to place too much pressure and will relieve some stress on your hand.
Begin with a very sharp Verithin Black to outline the eyes, bills and lines in and around fingers for proper placement and separation, but do not dig into the paper. Then use White on the lightest tips
of feathers, water drops, lightest areas across the fingers and ring highlights. Sharpen, and add highlights to both eyes.
Eggshell is used in the next lightest areas of the painting where indicated on the photo and value placement sheet as XXXXX, and most areas of the birds, except for dark areas, avoiding the eyes, bill and white highlights.
Step 2 – His Hand (L): Continue to use soft pressure until indicated. This is a rough and hard-working hand and it shows.
Cover the nails in a small circular motion with Rosy Beige, then Peach Beige until all paper is covered, rotating the paper as needed. With more pressure, highlight with White in the quicks of the nails and tips where indicated. With soft pressure cover the fingers with Ginger Root, going over creases on fingers but avoiding the nails; repeat with Peach Beige. With Light Umber, then French Grey 50% using soft pressure and the side of the pencil, go all the way around the outside of the fingers and the nails, blending where the values meet to shade the fingers.
Using more pressure but still the side of the pencil, highlight down the length, between cracked places and knuckles in White; blend over the fingers in Ginger Root. Go over cracked lines and around nails in Light Umber. Apply Peach Beige down both sides of the fingers where the values meet, then White in the lightest areas.
Step 3 – Her Hand (R): This is much softer and there are no hard lines.
Use Rosy Beige to basecoat in the softer hand of the woman, then Peach Beige, and highlight in White down the centers of the fingers and over knuckles. Soften with more Peach Beige over the entire hand.
With more pressure shade in French Grey 50% and between the fingers and under the feathers, blending with Peach Beige where values meet. Highlight with French Grey 10% with more pressure, avoiding hard lines. Add Cool Grey 90% to add a few very dark shadows to the left side of the hand, under feathers and ring, soften with French Grey 50%, then more Peach Beige over the rest of hand. Reinforce French Grey 10% highlights if lost.
  DECORATIVEPAINTERS.ORG 49
