
Page 65 - The Decorative Painter Spring 2017
P. 65
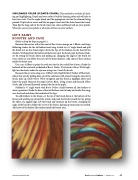
SIDELOADED COLOR (FLOATED COLOR): This method is used for all shad- ing and highlighting. Depth and even color is built by layering color and will take at least two coats. Use the angle brush and the appropriate size for the element being painted. Dip brush in water and blot on paper towel until the shine leaves the brush. Then dip the long side of the brush (toe) into color and blend well on your palette. What you see on your palette is what you will see on your surface.
LET’S PAINT ROOSTER AND FACE
(Refer to Step-by-Step on page 61.)
Basecoat the rooster with a thin coat of Raw Sienna using a no. 6 filbert, and shape following strokes for the tail feathers and wing. Switch to a 1⁄2" angle brush and pull the brush out on the chisel edge to form the tips of the feathers on the head of the chicken. Working from the bottom of the breast up to the head, paint the breast feath- ers by setting the brush down and pulling up, changing the angle of the brush for every stroke as you follow the curve of the breast feathers. Add some of these strokes inside the breast area.
Use a no. 4 filbert to paint the oval area for the face solid Raw Sienna. Shade the backside of the oval with a sideload of Burnt Umber. Dry-brush a Warm White high- light on the cheek under the eye area using a no. 2 oval dry brush.
Basecoat the eye area using a no. 2 filbert with Naphthol Red. Feather off the back- side of this area by pulling lines out of the solid area with a liner. Using the same dirty brush, pick up a little Warm White to lighten and dry-brush a highlight above and below the pupil. Basecoat the pupil Carbon Black. Using a liner and thinned Yellow Oxide, add a dot and linework around the dot in the pupil.
Sideload a 1⁄2" angle brush with Burnt Umber; shade between all the feathers to show separation. Shade the base of the tail feathers next to body and under the wing, over the head and down the backside of the legs.
To add feathers to the breast, set the tip of the brush down at the bottom of the breast and working up toward the wattle, and push the brush toward the tip, giving the effect of a jagged edge. Lift the brush and continue up the breast, changing the angle of the brush to follow the curve of the breast, picking up more paint as needed.
 Add a few of the feather-like strokes inside the breast area.
  DECORATIVEPAINTERS.ORG The Decorative Painter • SPRING 2017 63
