
Page 160 - Kitab3DsMax
P. 160
Part I: Getting Started with 3ds Max
Changes to the Advanced Quad Menu Options dialog box affect all quadmenus. You can load and save these
settings to files (with the .qop extension). The Starting Quadrant determines which quadrant is first to appear
when the quadmenu is accessed. You can select to change the colors for each quadmenu independent of the
others. The column with the L locks the colors so they are consistent for all quadmenus if enabled.
The remainder of the Advanced Quad Menu Options dialog box includes settings for controlling how the
quadmenus are displayed and positioned, as well as the fonts that are used.
The Animation section lets you define the animation style that is used when the quadmenus appear. The ani-
mation types include None, Stretch, and Fade. The Stretch style slowly stretches the quadmenus until they
are full size over the designated number of steps, and the Fade style slowly makes the quadmenus appear.
Tip
I personally don’t like to wait for the quadmenus to appear, so I keep the Animation setting set to None. n
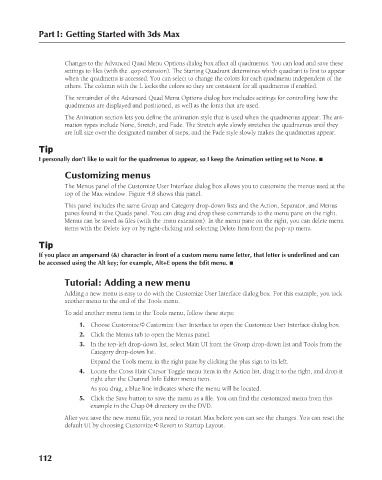
Customizing menus
The Menus panel of the Customize User Interface dialog box allows you to customize the menus used at the
top of the Max window. Figure 4.8 shows this panel.
This panel includes the same Group and Category drop-down lists and the Action, Separator, and Menus
panes found in the Quads panel. You can drag and drop these commands to the menu pane on the right.
Menus can be saved as files (with the .mnu extension). In the menu pane on the right, you can delete menu
items with the Delete key or by right-clicking and selecting Delete Item from the pop-up menu.
Tip
If you place an ampersand (&) character in front of a custom menu name letter, that letter is underlined and can
be accessed using the Alt key; for example, Alt+E opens the Edit menu. n
Tutorial: Adding a new menu
Adding a new menu is easy to do with the Customize User Interface dialog box. For this example, you tack
another menu to the end of the Tools menu.
To add another menu item to the Tools menu, follow these steps:
1. Choose Customize ➪ Customize User Interface to open the Customize User Interface dialog box.
2. Click the Menus tab to open the Menus panel.
3. In the top-left drop-down list, select Main UI from the Group drop-down list and Tools from the
Category drop-down list.
Expand the Tools menu in the right pane by clicking the plus sign to its left.
4. Locate the Cross Hair Cursor Toggle menu item in the Action list, drag it to the right, and drop it
right after the Channel Info Editor menu item.
As you drag, a blue line indicates where the menu will be located.
5. Click the Save button to save the menu as a file. You can find the customized menu from this
example in the Chap 04 directory on the DVD.
After you save the new menu file, you need to restart Max before you can see the changes. You can reset the
default UI by choosing Customize ➪ Revert to Startup Layout.
112
6/30/10 3:35 PM
09_617779-ch04.indd 112 6/30/10 3:35 PM
09_617779-ch04.indd 112