
Page 157 - Kitab3DsMax
P. 157
Chapter 4: Customizing the Max Interface and Setting Preferences
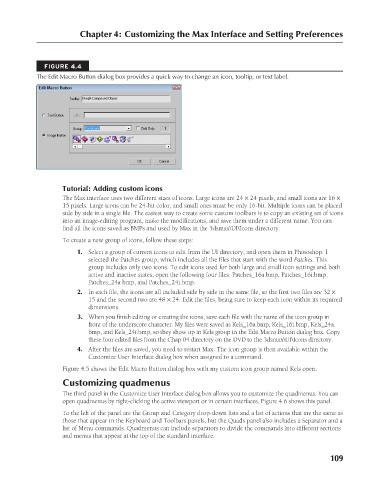
FIGURE 4.4
The Edit Macro Button dialog box provides a quick way to change an icon, tooltip, or text label.
Tutorial: Adding custom icons
The Max interface uses two different sizes of icons. Large icons are 24 × 24 pixels, and small icons are 16 ×
15 pixels. Large icons can be 24-bit color, and small ones must be only 16-bit. Multiple icons can be placed
side by side in a single file. The easiest way to create some custom toolbars is to copy an existing set of icons
into an image-editing program, make the modifications, and save them under a different name. You can
find all the icons saved as BMPs and used by Max in the 3dsmax\UI\Icons directory.
To create a new group of icons, follow these steps:
1. Select a group of current icons to edit from the UI directory, and open them in Photoshop. I
selected the Patches group, which includes all the files that start with the word Patches. This
group includes only two icons. To edit icons used for both large and small icon settings and both
active and inactive states, open the following four files: Patches_16a.bmp, Patches_16i.bmp,
Patches_24a.bmp, and Patches_24i.bmp.
2. In each file, the icons are all included side by side in the same file, so the first two files are 32 ×
15 and the second two are 48 × 24. Edit the files, being sure to keep each icon within its required
dimensions.
3. When you finish editing or creating the icons, save each file with the name of the icon group in
front of the underscore character. My files were saved as Kels_16a.bmp, Kels_16i.bmp, Kels_24a.
bmp, and Kels_24i.bmp, so they show up in Kels group in the Edit Macro Button dialog box. Copy
these four edited files from the Chap 04 directory on the DVD to the 3dsmax\UI\Icons directory.
4. After the files are saved, you need to restart Max. The icon group is then available within the
Customize User Interface dialog box when assigned to a command.
Figure 4.5 shows the Edit Macro Button dialog box with my custom icon group named Kels open.
Customizing quadmenus
The third panel in the Customize User Interface dialog box allows you to customize the quadmenus. You can
open quadmenus by right-clicking the active viewport or in certain interfaces. Figure 4.6 shows this panel.
To the left of the panel are the Group and Category drop-down lists and a list of actions that are the same as
those that appear in the Keyboard and Toolbars panels, but the Quads panel also includes a Separator and a
list of Menu commands. Quadmenus can include separators to divide the commands into different sections
and menus that appear at the top of the standard interface.
109
6/30/10 3:34 PM
09_617779-ch04.indd 109
09_617779-ch04.indd 109 6/30/10 3:34 PM