
Page 30 - fif pnim
P. 30
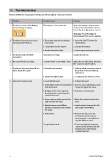
9. Troubleshooting 6.3.6. Insert endodontic file into the canal and connect the file clip to the file (to ensure precise mea-
surements the file size should be adjusted to the canal diameter). Alternatively, use the touch
Please review the suggested solutions before calling customer service. probe to provide electrical contact with the endodontic file.
The file image inside the tooth will appear (accompanied by a double beep signal). No file ima-
Problem Possible Cause Solution
ge and no sound signal indicate a faulty connection. Check your connections, clean your file
1 The device shows the following The battery is not connected. Open the battery compartment, clip/touch probe contact, moisten the canal, if necessary, and start again.
picture during charging: and connect the battery as descri-
bed in the User Manual, section 7.1. No other adjustments are necessary before starting measurements.
Warning: Use only original
battery pack from your supplier!
6.4. Cable connection test
2 The device does not turn on by 1. The button may be functioning 1. Press the On/OFF button for
pressing On/Off button incorrectly. several times. Connection test feature is included in CanalPro Apex Locator in order to
check the cables:
2. The battery may be empty. 2. Charge the battery.
• Connect the file clip contact to the lip clip. english
3. Electronic malfunction. 3. Contact your customer service.
• “Connection” symbol should appear on the status bar of the dis-
3 The device shuts off while The battery is empty. Charge the battery. play, indicating proper connection (Pic. 2).
measuring.
• If the symbol do not appear, the measurement cable or the file clip should
4 No sound while measuring. “Sound control” set at “Mute” level. Adjust the sound level by pressing be replaced.
the “Sound Control” button.
5 The device does not show file ad- 1. Bad electrical contact. 1. Perform cable connection test as
vance inside the canal described in the User Manual, Picture 2
section 6.4.
6.5 Apex localization
2. Electronic malfunction. 2. Contact your customer service.
6.5.1. Coronal and Medial Zone
6 Incorrect measurements 1. Dry/calcified canal. 1. Irrigate the canal.
Slowly introduce the file into the canal.
2. Restoration treatment conductive 2. Remove old canal filling to open
path is blocked. the path, irrigate the canal. The progression of the file inside the canal shown inside the tooth image on the left part of the
3. Spillage of blood or irrigating 3. Dry the excessive liquid. display (Pic. 3 to Pic. 5).
liquid provide conductive path
outside the canal.
4. Deep caries provides conductive 4. Block the external conductive
path outside the canal. path.
5. Metal crown or metal filling 5. Avoid contact between the file
provide conductive path outside and metal crown/filling.
the canal.
6. Perforation. 6. Remove the file, close the
perforation and repeat the
measurements, carefully inser-
ting the file into canal.
7. Large lateral canal. 7. Try to continue the measure-
ments (gently advance the file
towards apex until regular
readings appear).
Picture 1 Picture 3 Picture 4 Picture 5
30 23
# 25566_eyal-Y-MK1-550 - 25566_pnim_Y-MK1-550.1 | 1 - A | 18-06-11 | 09:04:00 | SR:-- | Magenta 25566_eyal-Y-MK1-550 - 25566_pnim_Y-MK1-550.1 | 1 - A | 18-06-11 | 09:04:00 | SR:-- | Yellow #25566_eyal-Y-MK1-550 - 25566_pnim_Y-MK1-550.1 | 1 - A | 18-06-11 | 09:04:00 | SR:-- | Black 25566_eyal-Y-MK1-550 - 25566_pnim_Y-MK1-550.1