
Page 5 - Halloween Magazine
P. 5
4 5
4
Method
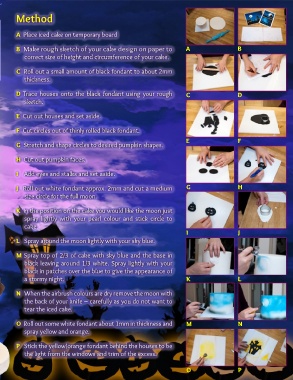
A Place iced cake on temporary board
Halloween Silhouette
B Make rough sketch of your cake design on paper to A B
correct size of height and circumference of your cake.
Cake Tutorial by Leesa Collins C Roll out a small amount of black fondant to about 2mm
thickness.
D Trace houses onto the black fondant using your rough C D
You’ll need: sketch.
E Cut out houses and set aside.
Airbrush
Cake and board covered in White Fondant F Cut circles out of thinly rolled black fondant.
Black Fondant (sugarpaste)
Rolling Pin G Stretch and shape circles to desired pumpkin shapes. E F
Sharp Craft Knife
Round cutters H Cut out pumpkin faces.
Scribing tool
Paint brushes I Add eyes and stalks and set aside.
Paint palette
Black gel colour J Roll out white fondant approx. 2mm and cut a medium G H
Piping gel size circle for the full moon.
Cornflour
Small cup of water K In the position on the cake you would like the moon just
Sky Blue, Black , Pearl, Yellow and Orange spray lightly with your pearl colour and stick circle to
airbrush colours cake.
I J
L Spray around the moon lightly with your sky blue.
M Spray top of 2/3 of cake with sky blue and the base in
black leaving around 1/3 white. Spray lightly with your
black in patches over the blue to give the appearance of
a stormy night. K L
N When the airbrush colours are dry remove the moon with
the back of your knife – carefully as you do not want to
tear the iced cake.
O Roll out some white fondant about 1mm in thickness and M N
spray yellow and orange.
P Stick the yellow/orange fondant behind the houses to be
the light from the windows and trim of the excess.
For ALL the items you need for this tutorial, click here O P
Get it from our shop
CLICK