
Page 13 - GP Spring 2020
P. 13
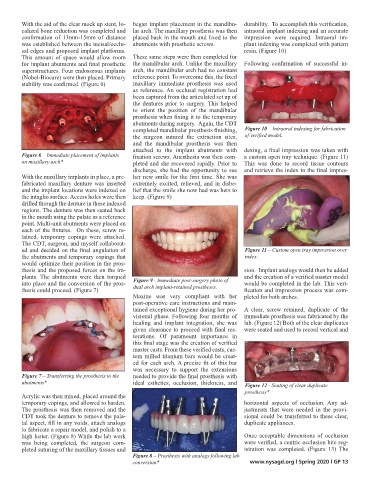
With the aid of the clear mock up stent, lo-  began implant placement in the mandibu-  durability.  To accomplish this verification,
        calized bone reduction was completed and  lar arch. The maxillary prosthesis was then  intraoral implant indexing and an accurate
        confirmation  of  13mm-15mm  of  distance  placed back in the mouth and fixed to the  impression were required.  Intraoral  im-
        was established between the incisal/occlu-  abutments with prosthetic screws.   plant indexing was completed with pattern
        sal edges and proposed implant platforms.                                 resin. (Figure 10)
        This amount of space  would allow  room  These same steps were then completed for
        for implant abutments and final prosthetic  the mandibular arch. Unlike the maxillary  Following  confirmation  of  successful  in-
        superstructures. Four endosseous implants  arch, the mandibular arch had no constant
        (Nobel-Biocare) were then placed. Primary  reference point. To overcome this, the fixed
        stability was confirmed. (Figure 6)  maxillary  immediate  prosthesis was used
                                             as reference. An occlusal registration had
                                             been captured from the articulated set up of
                                             the dentures prior to surgery. This helped
                                             to orient the position of the mandibular
                                             prosthesis when fixing it to the temporary
                                             abutments during surgery.  Again, the CDT
                                             completed mandibular prosthesis finishing,   Figure 10 – Intraoral indexing for fabrication
                                             the  surgeon sutured the  extraction  sites,   of verified model.
                                             and  the mandibular  prosthesis was then
                                             attached  to the implant  abutments with  dexing, a final impression was taken with
        Figure 6 – Immediate placement of implants   fixation screws. Anesthesia was then com-  a custom open tray technique. (Figure 11)
        on maxillary arch*                   pleted and she recovered rapidly. Prior to  This was done to record tissue contours
                                             discharge, she had the  opportunity  to see  and retrieve the index in the final impres-
        With the maxillary implants in place, a pre-  her new smile for the first time. She was
        fabricated  maxillary  denture  was inserted  extremely excited, relieved, and in disbe-
        and the implant locations were indexed on  lief that the smile she now had was hers to
        the intaglio surface. Access holes were then  keep. (Figure 9)
        drilled through the denture in these indexed
        regions. The denture was then seated back
        in the mouth using the palate as a reference
        point. Multi-unit abutments were placed on
        each of the fixtures.  On these, screw re-
        tained,  temporary  copings  were  attached.
        The CDT, surgeon, and myself collaborat-
        ed and decided on the final angulation of                                 Figure 11 – Custom open tray impression over
        the abutments and temporary copings that                                  index.
        would optimize their position in the pros-
        thesis and the proposed forces on the im-                                 sion.  Implant analogs would then be added
        plants.  The abutments  were then torqued   Figure 9 - Immediate post-surgery photo of   and the creation of a verified master model
        into place and the conversion of the pros-  dual arch implant-retained prostheses.  would be completed in the lab. This veri-
        thesis could proceed. (Figure 7)                                          fication and impression process was com-
                                             Maxine was very compliant  with her  pleted for both arches.
                                             post-operative care instructions and main-
                                             tained exceptional hygiene during her pro-  A  clear,  screw  retained,  duplicate  of  the
                                             visional phase. Following four months of  immediate prosthesis was fabricated by the
                                             healing  and  implant  integration,  she  was  lab. (Figure 12) Both of the clear duplicates
                                             given clearance to proceed with final res-  were seated and used to record vertical and
                                             torations.  Of paramount  importance  in
                                             this final stage was the creation of verified
                                             master casts. From these verified casts, cus-
                                             tom milled titanium bars would be creat-
                                             ed for each arch. A precise fit of this bar
                                             was  necessary to support the extensions
        Figure 7 – Transferring the prosthesis to the   needed to provide the final prosthesis with
        abutments*                           ideal esthetics, occlusion, thickness, and   Figure 12 - Seating of clear duplicate
                                                                                  prosthesis*
        Acrylic was then mixed, placed around the
        temporary copings, and allowed to harden.                                 horizontal  aspects  of occlusion.  Any ad-
        The prosthesis was then removed and the                                   justments  that  were  needed  in  the  provi-
        CDT took the denture to remove the pala-                                  sional could be transferred to these clear,
        tal aspect, fill in any voids, attach analogs                             duplicate appliances.
        to fabricate a repair model, and polish to a
        high luster. (Figure 8) While the lab work                                Once  acceptable  dimensions  of occlusion
        was being completed,  the  surgeon com-                                   were verified, a centric occlusion bite reg-
        pleted suturing of the maxillary tissues and                              istration  was completed.  (Figure 13)  The
                                             Figure 8 – Prosthesis with analogs following lab
                                             conversion*                            www.nysagd.org l Spring 2020 l GP 13