
Page 64 - RHEL8 BOOK
P. 64
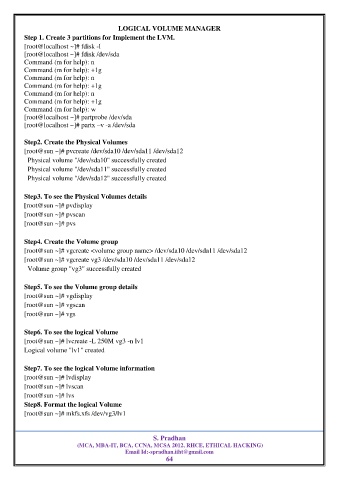
LOGICAL VOLUME MANAGER
          Step 1. Create 3 partitions for Implement the LVM.
          [root@localhost ~]# fdisk -l
          [root@localhost ~]# fdisk /dev/sda
          Command (m for help): n
          Command (m for help): +1g
          Command (m for help): n
          Command (m for help): +1g
          Command (m for help): n
          Command (m for help): +1g
          Command (m for help): w
          [root@localhost ~]# partprobe /dev/sda
          [root@localhost ~]# partx –v -a /dev/sda

          Step2. Create the Physical Volumes
          [root@sun ~]# pvcreate /dev/sda10 /dev/sda11 /dev/sda12
            Physical volume "/dev/sda10" successfully created
            Physical volume "/dev/sda11" successfully created
            Physical volume "/dev/sda12" successfully created

          Step3. To see the Physical Volumes details
          [root@sun ~]# pvdisplay
          [root@sun ~]# pvscan
          [root@sun ~]# pvs

          Step4. Create the Volume group
          [root@sun ~]# vgcreate <volume group name> /dev/sda10 /dev/sda11 /dev/sda12
          [root@sun ~]# vgcreate vg3 /dev/sda10 /dev/sda11 /dev/sda12
            Volume group "vg3" successfully created

          Step5. To see the Volume group details
          [root@sun ~]# vgdisplay
          [root@sun ~]# vgscan
          [root@sun ~]# vgs

          Step6. To see the logical Volume
          [root@sun ~]# lvcreate -L 250M vg3 -n lv1
          Logical volume "lv1" created

          Step7. To see the logical Volume information
          [root@sun ~]# lvdisplay
          [root@sun ~]# lvscan
          [root@sun ~]# lvs
          Step8. Format the logical Volume
          [root@sun ~]# mkfs.xfs /dev/vg3/lv1


                                                       S. Pradhan
                             (MCA, MBA-IT, BCA, CCNA, MCSA 2012, RHCE, ETHICAL HACKING)
                                             Email Id:-spradhan.iiht@gmail.com
                                                           64