
Page 9 - cortex-user-guide-276-1604
P. 9
CORTEX Microcontroller and Joystick User Guide
6. Joystick Calibration: With the CORTEX linked to the Joystick using VEXnet keys, push and hold Joystick 6U Button.
With the button depressed, push and hold the Config Switch. You can release both when the Joystick LED begins to flash
Red and then Green. Now move both joysticks to the maximum position in all directions. When both joysticks have been
detected, the Joystick LED goes Green. Now push any of the four “8” Buttons to save the cal. The Joystick LED will flash
Green for a few seconds to indicate a good saved cal; otherwise the calibration was not successful. If you take too long to
complete the calibration, it will time-out and will not be successful.
Refer to the VEX Wiki (http://www.vexforum.com/wiki/index.php/VEXnet_Joystick).
7. Tethering: If the units fail to link up, tethering may be required. Please see item 1 of this document for instructions on how
to tether your VEXnet Joystick to the CORTEX Microcontroller.
8. Debugging:
a. Slow blinking green Robot light on CORTEX.
Solution: Try VEXnet Upgrade Utility.
b. Yellow or Red Robot light on the CORTEX. Solution: used fully charged Robot battery.
c. Yellow or Red Robot light on the Joystick, even though the CORTEX is green. Solution: Joystick latches CORTEX’s
lowest battery level. Power cycle both Joystick and CORTEX.
d. Fast Red blinking Robot light when plugged in to a competition field. Solution: Use a fully charged 9v back-up battery
plugged in to the CORTEX.
e. Robot does not shut off when turned OFF. Solution: At the end of the match, remove the Ethernet cable from the
Competition Port of the Joystick. The CORTEX and Joystick will change to non-competition mode. Power off the
Joystick and CORTEX. The CORTEX will shut off in about 5 seconds.
f. Robot does not do what you want it to do. Solution: Download the default code and test to isolate hardware problems.
Then make small program changes testing after each change.
g. Robot still does not link up, even after tethering. Solution: Debug using a friends system to narrow down the problem,
check the VEX Forum or contact VEX Robotics for assistance.
h. Downloading Master Code to the Joystick will erase User Calibration and restore the Joystick to Factory Calibration.
Please see item 6 of this document for instructions on how to recalibrate your Joystick.
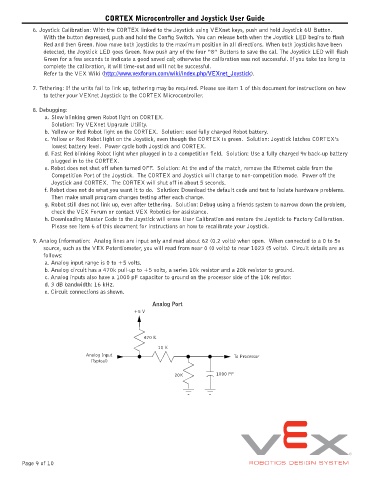
9. Analog Information: Analog lines are input only and read about 62 (0.2 volts) when open. When connected to a 0 to 5v
source, such as the VEX Potentiometer, you will read from near 0 (0 volts) to near 1023 (5 volts). Circuit details are as
follows:
a. Analog input range is 0 to +5 volts.
b. Analog circuit has a 470k pull-up to +5 volts, a series 10k resistor and a 20k resistor to ground.
c. Analog inputs also have a 1000 pF capacitor to ground on the processor side of the 10k resistor.
d. 3 dB bandwidth: 16 kHz.
e. Circuit connections as shown.
Analog Port
+5 V
470 K
10 K
Analog Input To Processor
(Typical)
20K 1000 PF
Page 9 of 10