
Page 257 - METRO CENTER PDF BINDER 1_Neat
P. 257
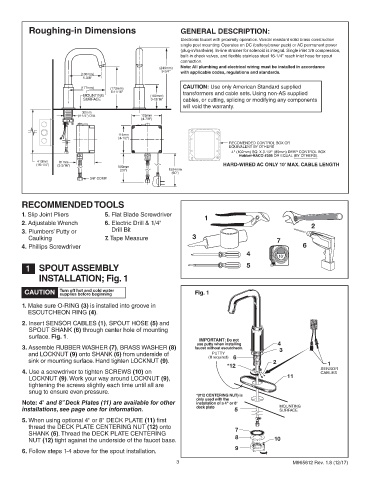
Roughing-in Dimensions                            GENERAL DESCRIPTION:
                                                             Electronic faucet with proximity operation. Vandal resistant solid brass construction
                                                             single post mounting. Operates on DC (battery/power pack) or AC permanent power
                                                             (plug-in/hardwire). In-line strainer for solenoid is integral. Single inlet 3/8 compression,
                                                             built-in check valves, and flexible stainless steel 16-1/4" reach inlet hose for spout
                                                             connection.
                                                      (249mm)  Note: All plumbing and electrical wiring must be installed in accordance
                                                      9-3/4"  with applicable codes, regulations and standards.
                            (136mm)
                            5-3/8"
                            (177mm)   (173mm)                 CAUTION: Use only American Standard supplied
                             7"       6-11/16"
                             MOUNTING              (100mm)    transformers and cable sets. Using non-AS supplied
                             SURFACE               3-15/16"   cables, or cutting, splicing or modifying any components
                                                              will void the warranty.
                            32mm
                           (1-1/4") DIA.        125mm
                                                (4-7/8")

                                        114mm
                                        (4-1/2")
                                                                             RECOMENDED CONTROL BOX OR
                                                                             EQUIVALENT BY OTHERS
                                                                              4" (102mm) SQ. X 3-1/2" (89mm) DEEP CONTROL BOX
                                                                                Hubbel-RACO #256 OR EQUAL (BY OTHERS).
             413mm   81mm
             (16-1/4")  (3-3/16")       500mm                              HARD-WIRED AC ONLY 10' MAX. CABLE LENGTH
                                         (20")           1524mm
                                                          (60")
                               3/8" COMP.


        RECOMMENDED TOOLS
        1.  Slip Joint Pliers       5.  Flat Blade Screwdriver
                                                                     1
        2.  Adjustable Wrench       6.  Electric Drill & 1/4"                                           2
        3.  Plumbers’ Putty or        Drill Bit
          Caulking                  7.  Tape Measure             3
                                                                                             7
        4.  Phillips Screwdriver                                                                     6
                                                                                   4         10'

          1    SPOUT ASSEMBLY                                                      5

              INSTALLATION; Fig. 1

         CAUTION     Turn off hot and cold water                  Fig. 1
                     supplies before beginning
        1.  Make sure O-RING (3) is installed into groove in
          ESCUTCHEON RING (4).
        2.  Insert SENSOR CABLES (1), SPOUT HOSE (5) and
           SPOUT SHANK (6) through center hole of mounting
           surface. Fig. 1.
                                                                   IMPORTANT: Do not
                                                                  use putty when installing  4
        3.  Assemble RUBBER WASHER (7), BRASS WASHER (8)          faucet without escutcheon.  3
                                                                       PUTTY
          and LOCKNUT (9) onto SHANK (6) from underside of            (If required) 6
          sink or mounting surface. Hand tighten LOCKNUT (9).                              2                 1
                                                                            *12                            SENSOR
        4.  Use a screwdriver to tighten SCREWS (10) on                                                    CABLES
           LOCKNUT (9). Work your way around LOCKNUT (9),                                       11
           tightening the screws slightly each time until all are
           snug  to ensure even pressure.
                                                                  *(#12 CENTERING NUT) is
                                                                  only used with the
        Note: 4" and 8” Deck Plates (11) are available for other   installation of a 4" or 8"
                                                                  deck plate                 MOUNTING
        installations, see page one for information.                           5             SURFACE
        5.  When using optional 4" or 8" DECK PLATE (11) first
          thread the DECK PLATE CENTERING NUT (12) onto                        7
          SHANK (6). Thread the DECK PLATE CENTERING
          NUT (12) tight against the underside of the faucet base.             8            10
                                                                               9
        6.  Follow steps 1-4 above for the spout installation.
                                                           3                                        M965612 Rev. 1.8 (12/17)